TL;DR; GraphQL is a good way of making your API more flexible and less resource consuming. But if you think that type-definition is cumbersome then read on. With the modules we provide you'll be able to expose fully functional resources with one line of code.
For those who haven't followed the GraphQL trend launched by Facebook, it's a fancy way of mixing API and SQL concepts together.
Instead of making calls to a properly structured endpoint with parameters like with REST APIs, GraphQL makes you build syntactic queries that you send to one endpoint.
The benefit of GraphQL? A properly defined standard for:
- Making multiple queries as once
- Forcing consumers to select the fields they need
- Fetching related resources as part of parent resources
- Paginating resources and sub-resources (using relay-style pagination)
- Strongly-typing the resources you expose
- Documenting your API without the immediate need for a separate documentation website
Couldn't a REST API do the above? Of course it could. But GraphQL has defined a standard for all these and many clients are already out there providing out of the box functionalities for interacting with GraphQL APIs. So...why not give it a try?
If you need more convincing you can read GitHub's blog article explaining why they switched.
When it comes to implementing a GraphQL server in Rails, one can use the excellent GraphQL Ruby gem.
The gem provides all the foundations for building your API. But the implementation is still very much manual, with lots of boilerplate code to provide.
In this article I will guide you through the steps of bootstrapping GraphQL Ruby then show you how - with a bit of introspection - you can easily expose your resources the Rails Way™ (= with one line of code).
First steps with graphql-ruby
Let's dive into graphql-ruby and see how we can go from zero to first query.
Installing graphql-ruby
First add the graphql gem to your Gemfile:
Then run the install generator:
The generator will create the GraphQL controller, setup the base types and update your routes.
That's it for the install part. Now let's see how we can expose resources to query.
Defining and exposing models
The first important file to look at is the Types::QueryType file. This class defines all the attributes which can be queried on your GraphQL API.
For the purpose of demonstrating how records get exposed, let's generate a User and a Book model.
We'll expose these two classes for querying on our GraphQL API. To do so we need to define their type.
We'll start by defining a base type for common record attributes. These kind of base classes can help keep your type classes more focused.
Then let's define GraphQL types for our models.
This is the User type:
This is the Book type. You'll notice that the user field reuses the User type.
Now that we have defined our types we need to plug them to the GraphQL Query API. This plumbing happens in the Types::QueryType class.
Here is the generated Types::QueryType class that we have expanded a bit to expose our collections. We use connection_type instead of arrays on the Book and User types so as to automatically benefit from relay-style pagination.
Let's see how we can use our API now.
Querying the GraphQL API
The easiest way to query your GraphQL API is to use GraphiQL.
Good news though, the GraphQL gem generator automatically adds the graphiql-rails gem to your gemfile. After running bundle install you should be able to access GraphiQL on* http://localhost:3000/graphiql*
You might encounter a precompilation error. In that case update your manifest.js and add the GraphiQL assets.
If you prefer, you can also install GraphiQL as a standalone app. See this link for more info.
When you open GraphiQL, the first thing you should look at is the docs section. You'll notice that all your models and fields are properly documented there. That's neat.
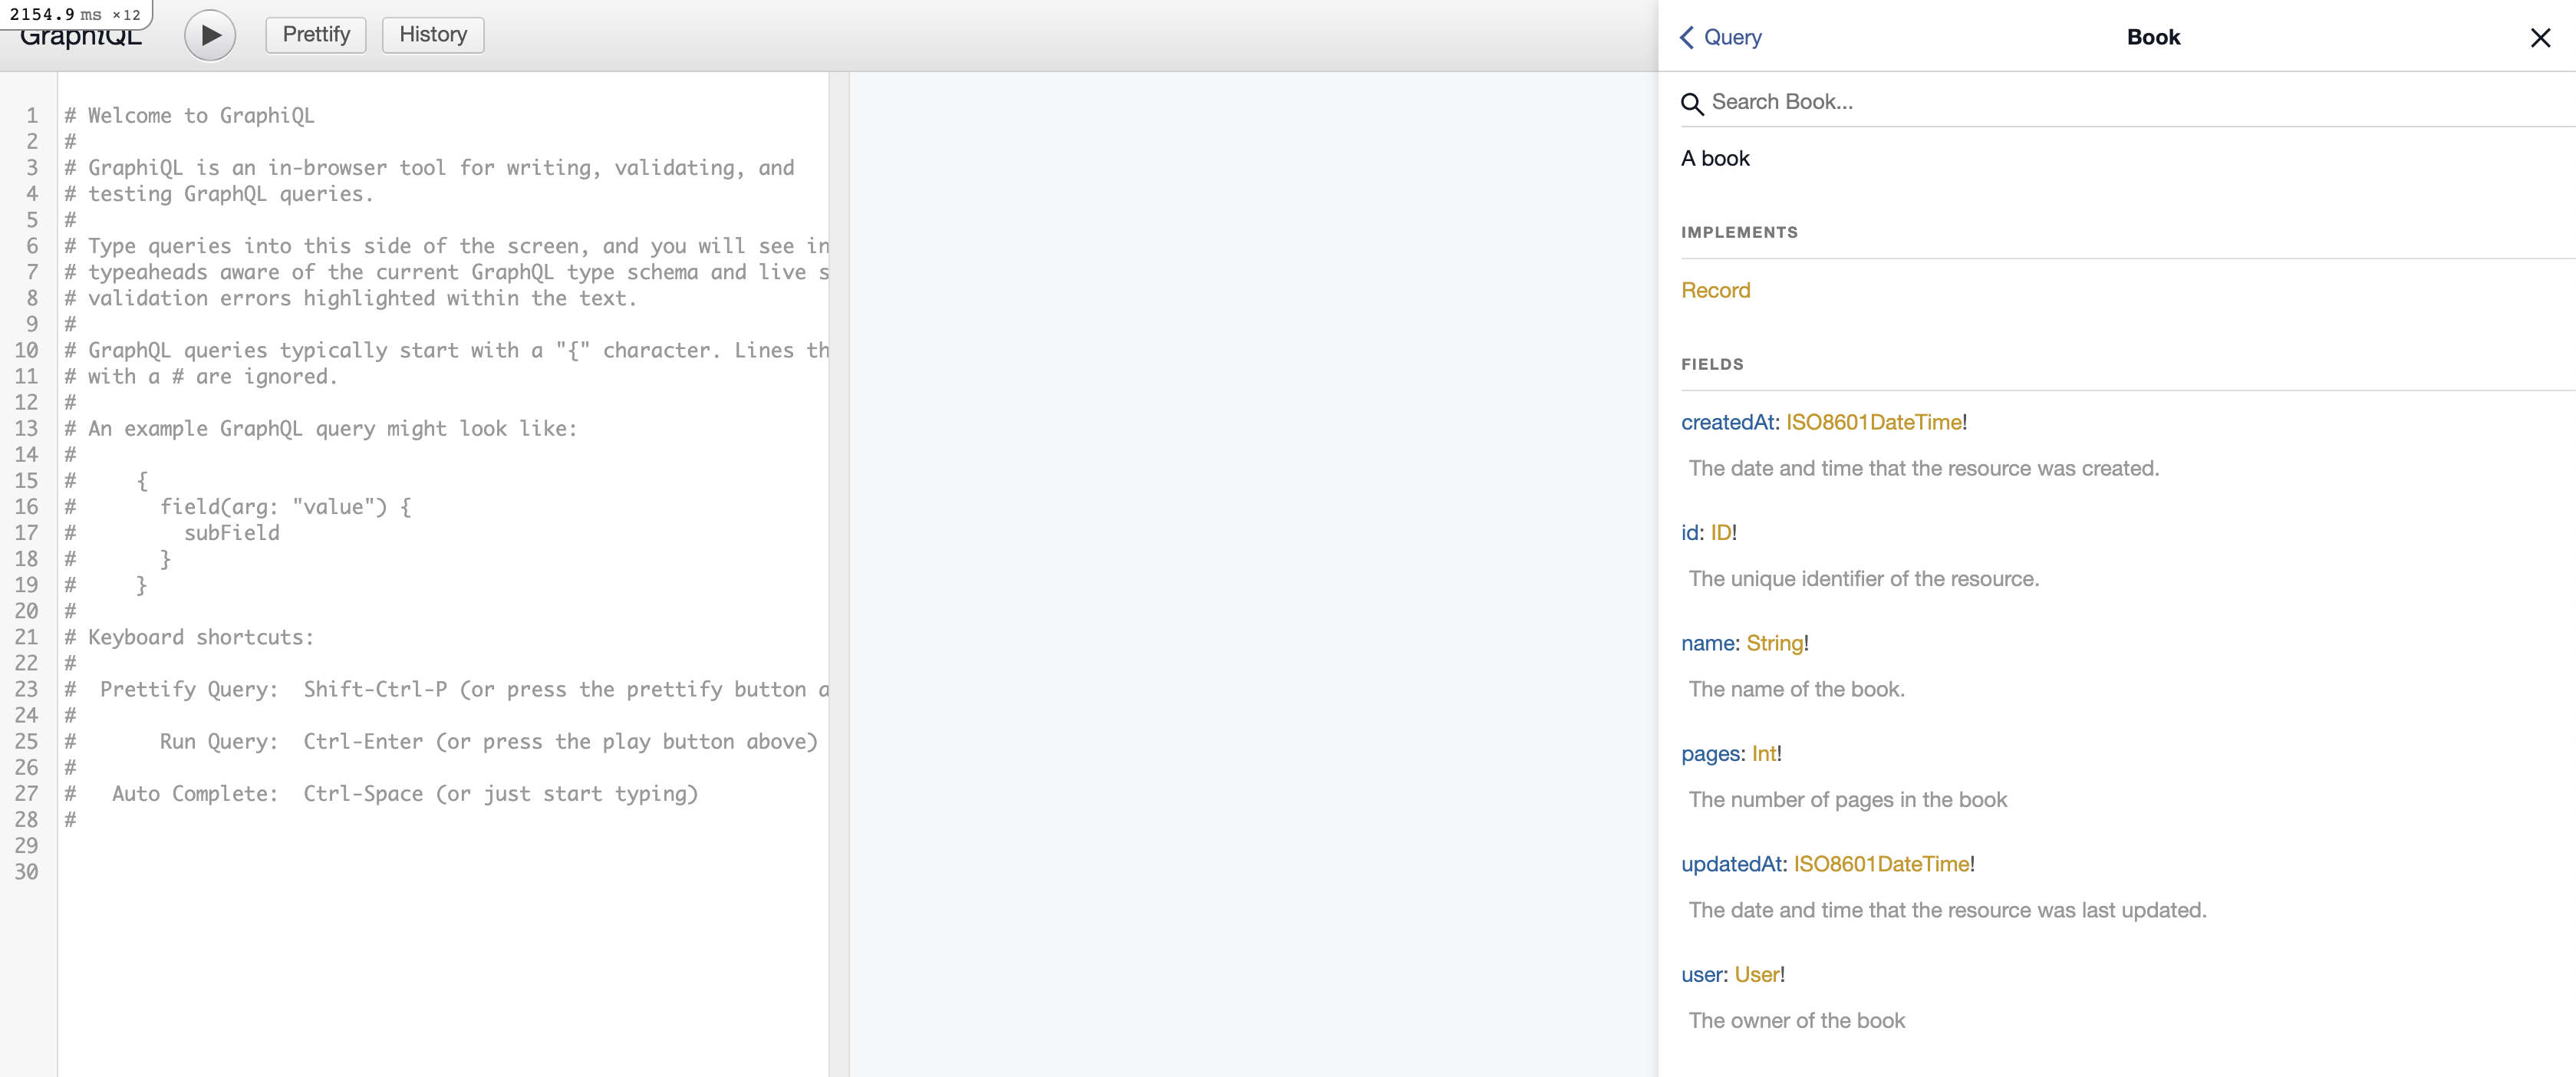
Let's create some test records via the Rails console:
Cool. Now we can perform our query.
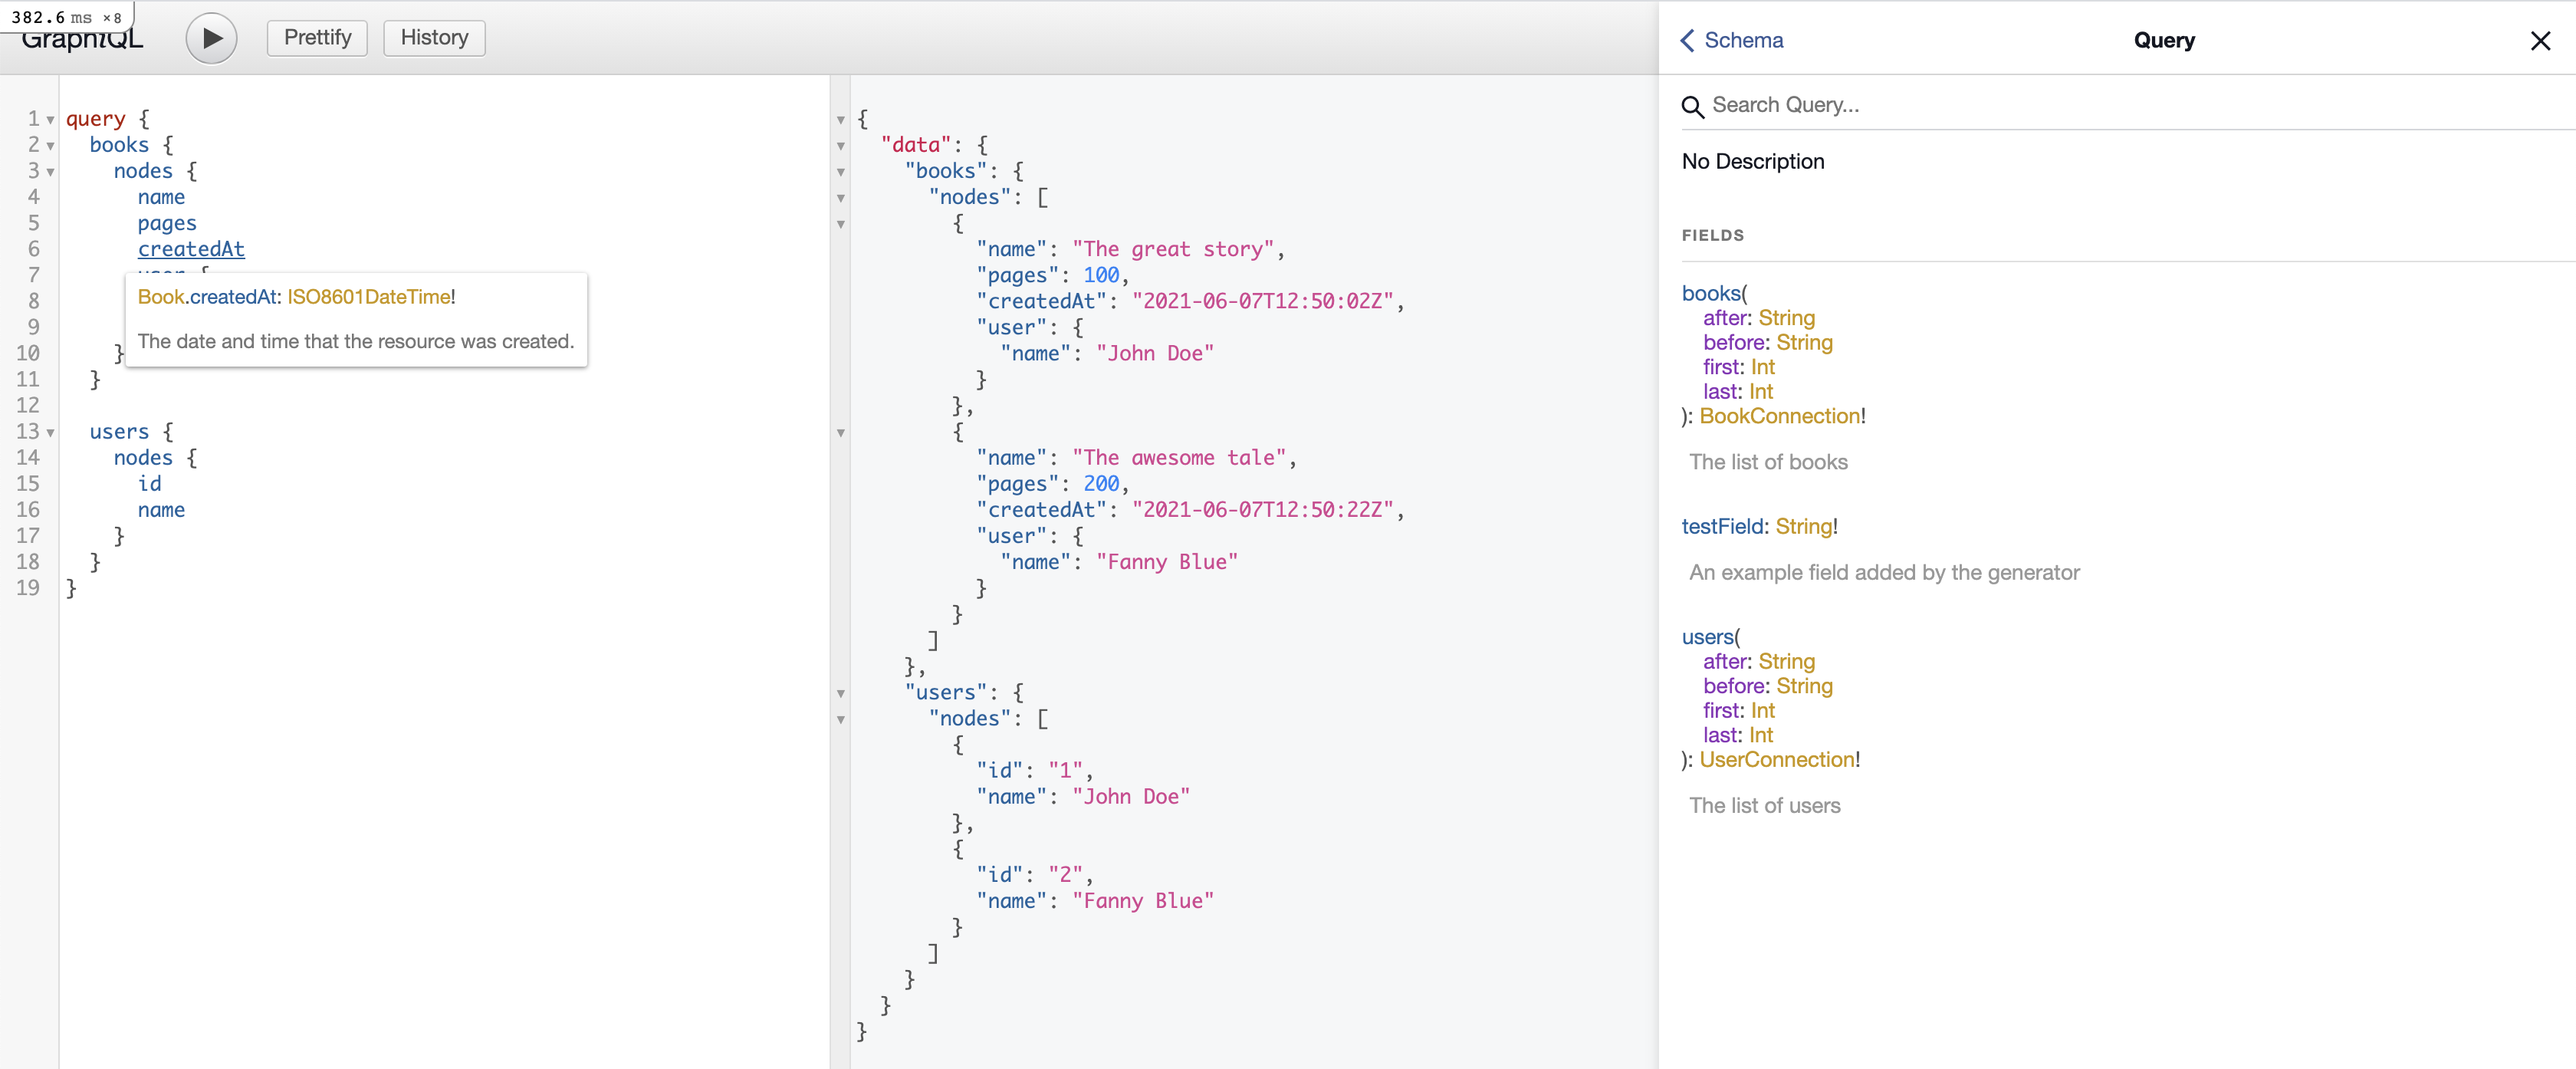
Note how GraphQL allows us to perform multiple queries at once. That's really sweet.
Adding filtering attributes to your collections
It would be nice to have filters on our collections. The gem allows us to do that via field block definitions.
Here is a concrete example of adding a filter on page size.
Now you can easily filter on book size.
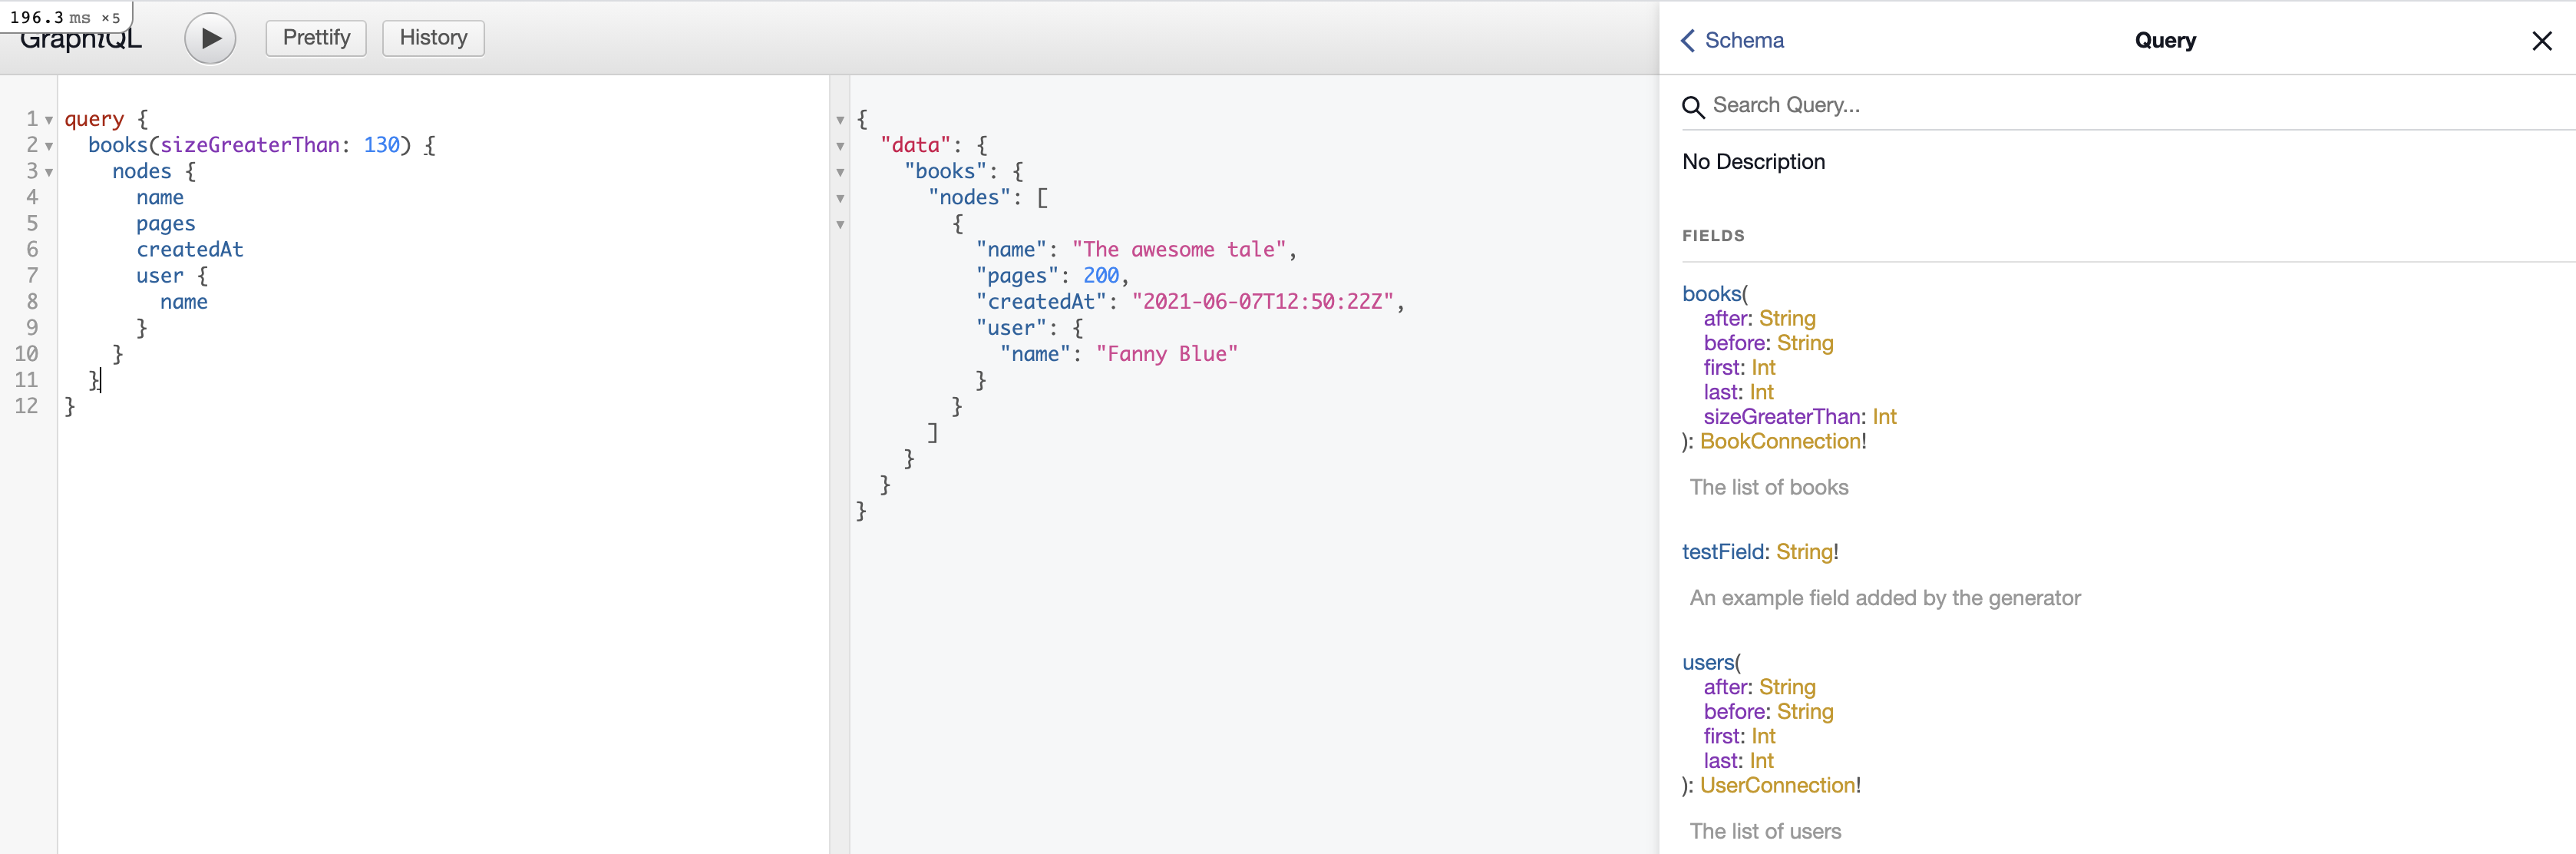
Nice!
But I'm used to Rails where everything is inferred out of the box. Right now it looks quite cumbersome to define all these collections and filters. Isn't there a way to automatically generate those?
Of course there is. Time to use GraphQL custom resolvers with a bit of introspection!
Automatically defining resources and filters
In order to automatically build resources and their corresponding filters we'll need three things:
- A GraphQL helper to expose Active Record resources
- A custom resolver authorizing and querying our collections
- An Active Record helper to evaluate the query filters received from GraphQL.
The modules below are configured to use Pundit - if present - to scope access to records. Pundit is really just given as an example - any scoping framework would work, even custom policy classes.
Active Record query helpers
Let's start with the Active Record helper.
Add the following concern to your application. This concern allows collections to be filtered using underscore notation (e.g. created_at_gte for created_at >=) and sorting using dot notation (e.g. created_at.desc).
Use this concern in your ApplicationRecord base class.
Great! Now you can filter and sort records this way:
The concern also defines a default graphql_scope, which is used by our resolvers. This scope can be overridden on each model to define API-specific eager loading strategies.
Here is an example with our book model:
GraphQL custom resolvers for collection and find queries
Now let's add a custom resolver to dynamically support our collections and corresponding filters.
The resolver looks at all the fields defined on the model type and automatically generate filters for fields which are database queriable.
Let's also add a custom resolver to support fetching model by unique attribute.
Any field your define as ID on your model types will be exposed as a primary key for record fetching purpose.
In both resolvers I've made Pundit optional. But I strongly recommend using it or any similar framework. You should read the comments above each pundit_ method in the resolver and adapt based on your needs.
For authorization purpose, you can inject a current_user attribute inside the GraphQL context by modifying your GraphqlController. Here is an example:
GraphQL base object to define resources and has_many
We have custom resolvers to handle the GraphQL query logic and model-level helpers to translate these into database-compatible filters. The last missing piece is a helper allowing us to declare our GraphQL resources.
To do this, add the following helper methods to your Types::BaseObject class.
The above provides two helpers:
- resource: a helper to be used inside Types::QueryType to expose an Active Record model for collection querying and record fetching.
- has_many: a way to define sub-collections on a type.
You can now rewrite your Types::QueryType class the following way:
Also let's add a has_many books on our User model and type:
Querying our newly implemented resources
We're ready. Let's see how this works now.
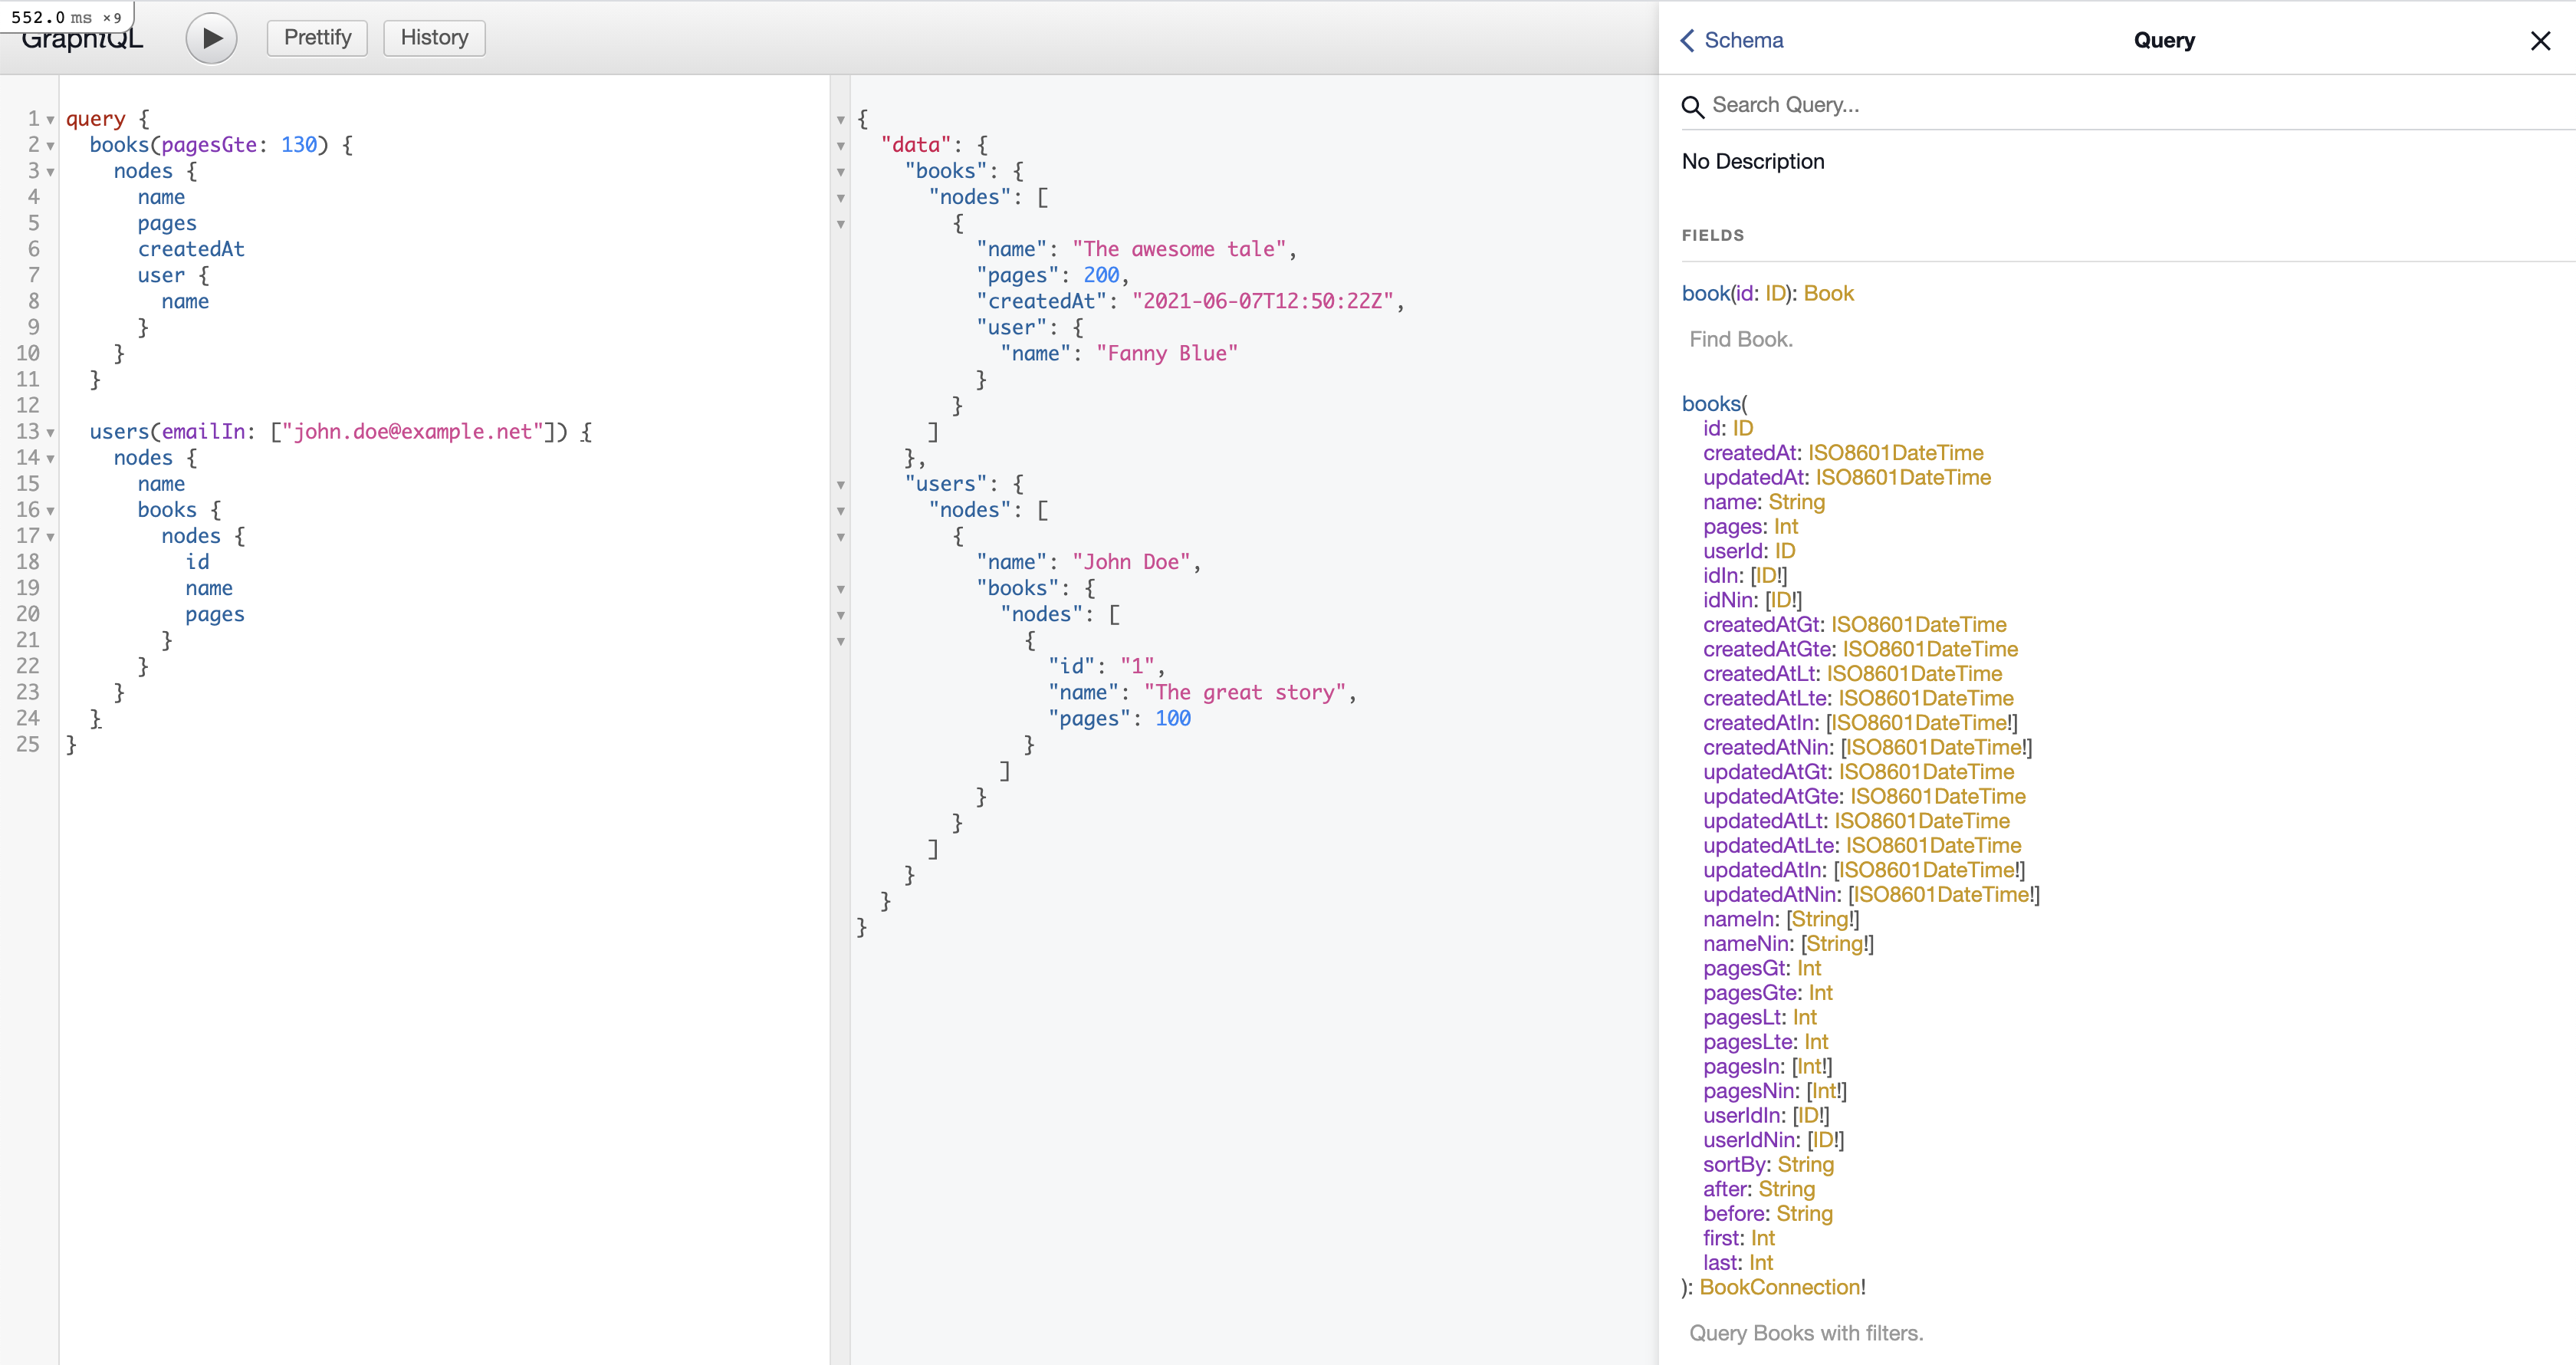
As you can see on the right-hand side, all our collection filters are properly generated. We can also fetch records individually by ID field (id or any other ID field on the type). Finally, we can fetch sub-resources on parent records, such as user books.
Wrapping up
A bit of metaprogramming makes the whole GraphQL-Rails experience way easier than it was originally advertised. Now all we need to do is define model types and declare resources in our Types::QueryType.
But there is more we can do. In the next episodes we'll see how to do similar things for mutations (create/update/delete) and subscriptions (via Pusher as a specific example).
About us
Keypup's SaaS solution allows engineering teams and all software development stakeholders to gain a better understanding of their engineering efforts by combining real-time insights from their development and project management platforms. The solution integrates multiple data sources into a unified database along with a user-friendly dashboard and insights builder interface. Keypup users can customize tried-and-true templates or create their own reports, insights and dashboards to get a full picture of their development operations at a glance, tailored to their specific needs.
Code snippets hosted with ❤ by GitHub