TL;DR; If you need to deploy a Rails app, checkout Cloud Run, Berglas, Cloud SQL, Memorystore, Monitoring and Trace. Also look at Cloud Tasks and Pub/Sub to further scale your app. These services will give your app solid foundations and will cover a lot of your backend needs.
At Keypup we are strong advocate of Google Cloud Platform. Not only do they offer a very generous free tier to startups - up to USD100k credits over multiple years - but they also provide a robust developer-centric platform with prebuilt services covering most of your application needs.
Our stack is fairly standard. We use React in frontend, Rails in backend (microservices) and GraphQL for our APIs.
So how do mix these with GCP? This article focuses on backend deployment. For frontend deployment, checkout our article on deploying SPAs and routing traffic using Cloudflare Workers.
Prerequisite
In order to perform some of the steps described in this article, you will need the gcloud CLI installed on your machine.
Follow these instructions to install and configure the CLI.
The runtime: Cloud Run
Cloud Run is GCP's response to serverless and allows any Dockerizable application to become serverless.
Cloud Run's scheduler is designed to automatically handle the scalability of your application based on the number of concurrent requests hitting it. Also - and to prevent slow requests on cold starts - it will also automagically keep a pool of warm instances available based on traffic.
The best of it? You do not pay for this pool of warm instances, you only pay for request processing time. And yes, Cloud Run scales down to zero, which makes it perfect for non-production environments as well.
Deploying to Cloud Run: a three step approach
Our Cloud Run deployments are initiated from Cloud Build. We chose Cloud Build to centralize and simplify access management via GCP but the truth is that any CI service will do.
When deploying an application, we proceed in three steps:
- We build the application (Docker image)
- We deploy a "warmup" version of the application with tasks that must run on deploy, such as Rails migrations.
- We deploy a "hot" version of the application which is streamlined to reduce boot time once step (2) is successful. When this step completes, the instances deployed on step (2) will be retired.
One might ask why I'm not running migrations as part of our build? Well this is me being paranoid about production DB access. If you can limit the number of entry points to your DBs, do it. Running migrations as part of Cloud Run deployments has been successful and sufficient for us so we do not need to expose our DBs to our build runtime.
The drawback of this approach? Your migrations must remain short. If you need time-consuming migrations, consider writing backward-compatible migrations in background jobs.
Let's see what the build steps look like:
If using Cloud Build, you can easily transform these steps in yml format. The _SERVICE_ID variable can be substituted when submitting the job.
Now, let's have a look at our Dockerfile. The only fancy line that might prompt you is the RAILS_MASTER_KEY_LINK variable, which is a Berglas reference. We'll come to secret management in the next section.
Finally here is our Docker entrypoint. Considering the build steps above, this entrypoint should not surprise you much. Again, we'll look at Berglas in the next section.
That's it. The approach above gives a complete flow to deploy your Rails app on Cloud Run.
Managing secrets: Berglas to the rescue
There are many ways to manage secrets, including popular solutions such as HashiCorp Vault.
You don't have time to put an elaborated solutions in place? Then use Berglas. It's simple, secure and efficient. And it works really well with Rails secrets.
How does berglas work? Berglas is essentially a wrapper for Google Storage and KMS. You'll perform three main steps with the CLI:
- Encrypt and upload your secrets to Google Storage
- Give read permissions to service accounts (e.g. Cloud Run service account) to read specific secrets
- Access secrets from Cloud Run
Let's setup Berglas for the first time.
Now let's create a secret and give our Cloud Run user access to it.
Finally, configure your Dockerfile to point to this secret. Our entrypoint.sh will do the rest.
Your secrets are now safe. Easy enough.
Datastores: Postgres and Redis
We primarily use two types of datastores internally:
- Cloud SQL Postgres, for persistent data storage
- Memorystore Redis, for caching
Cloud SQL: Postgres
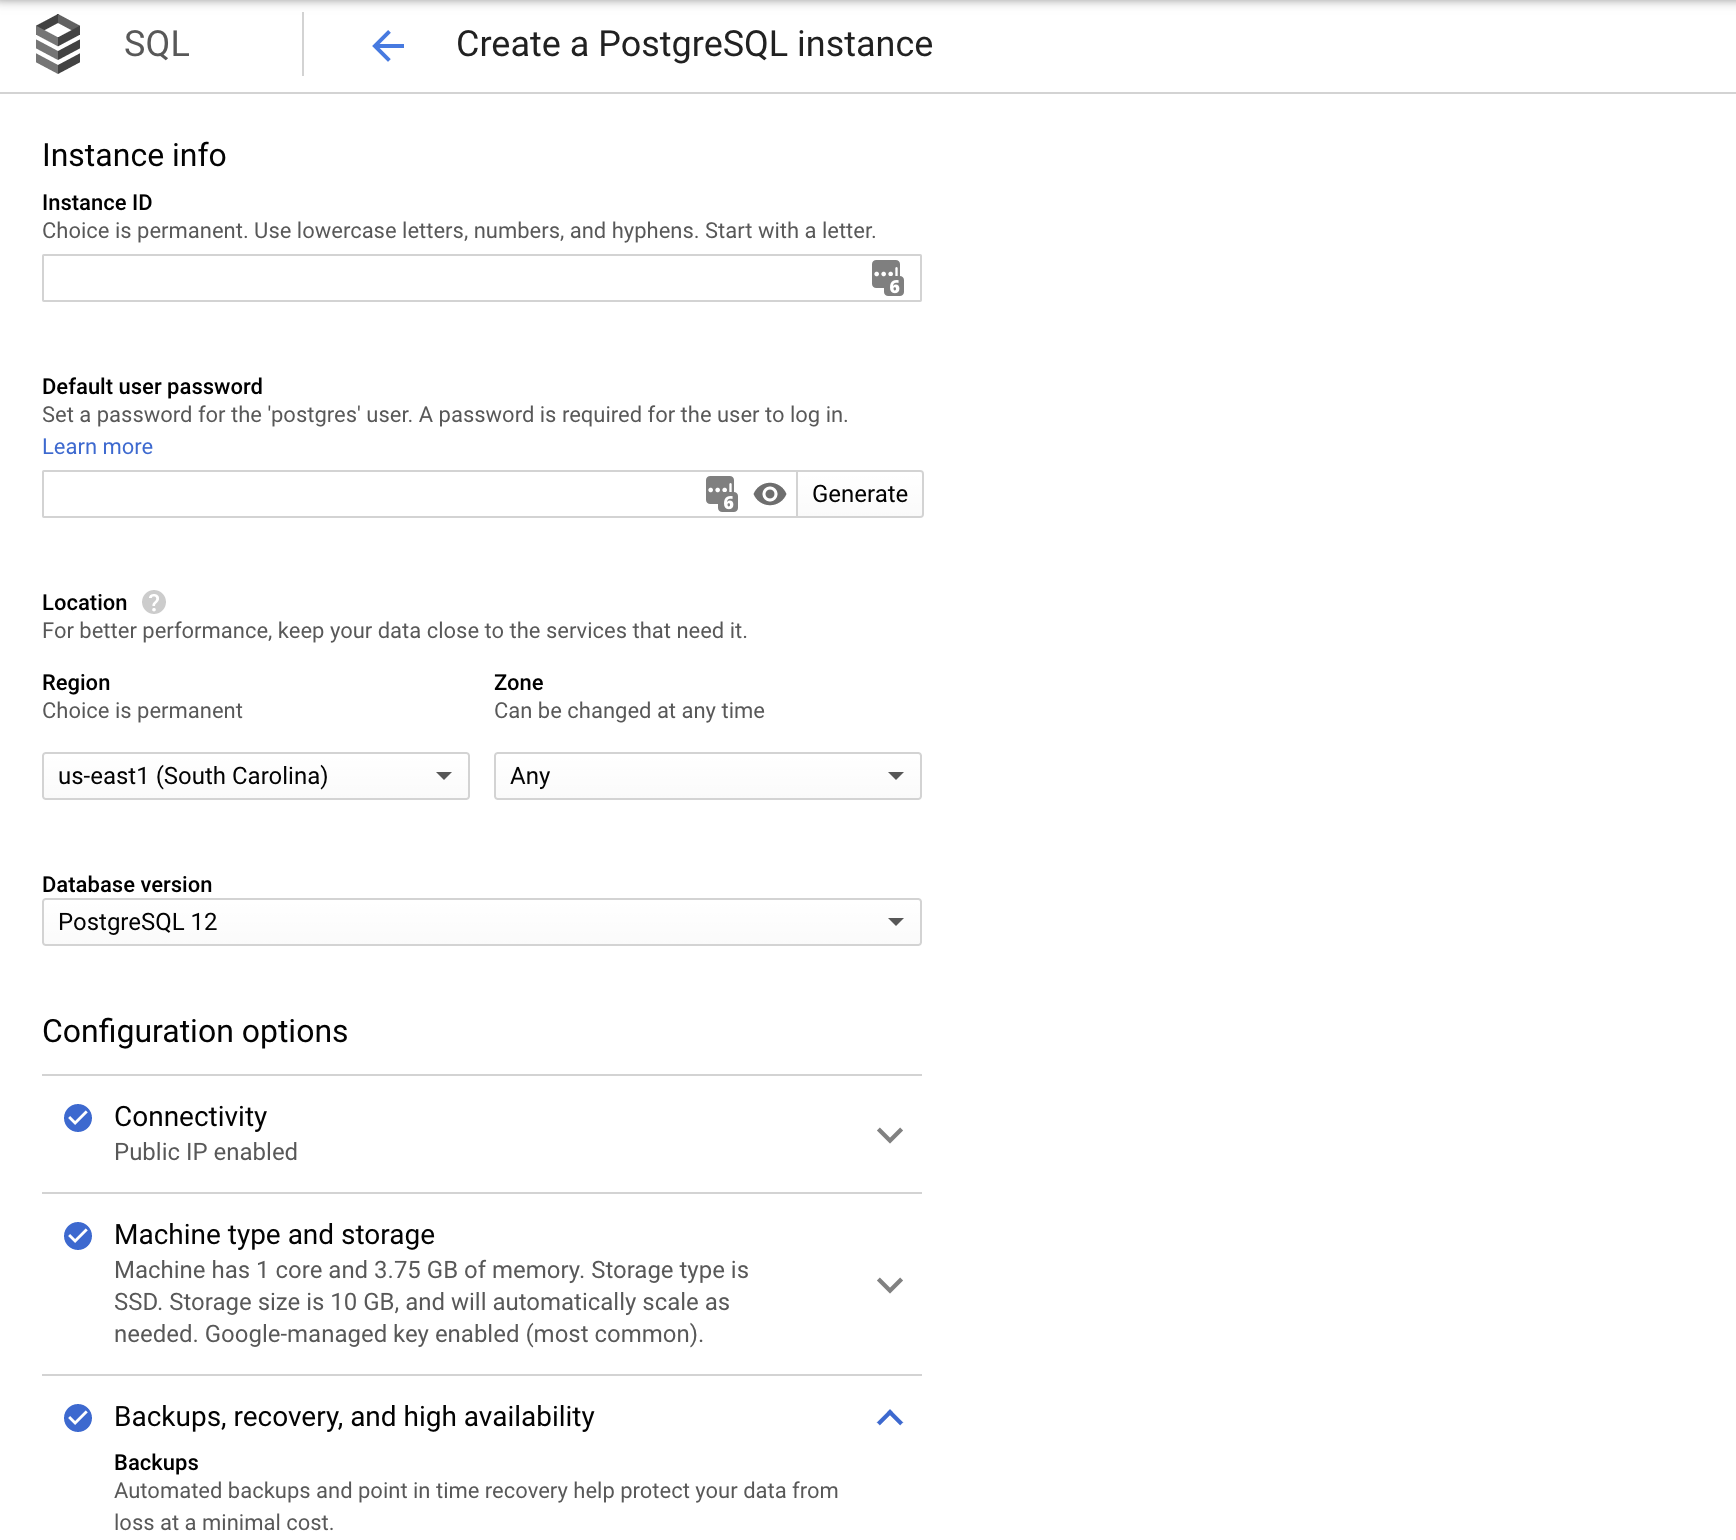
Creating a Postgres instance is fairly straightforward from the GCP console.
Just head to Cloud SQL then choose the type of instance you need. For production instances, make sure you have High Availability enabled if your budget allows for it.
Now let's create our application-specific database and user.
Ideally these steps should be done via a build script to limit direct user interactions with production DBs. But I will take this opportunity to show you how to connect to your database in case of emergency.
GCP has greatly improved the ways to remotely access DBs. Assuming you have the right to connect, simply run the following command to authorize your IP and access your DB in one step.
From there you can create your application user and database:
You can then update your Rails database.yml file. Note the special host URI used to connect from Cloud Run to Cloud SQL.
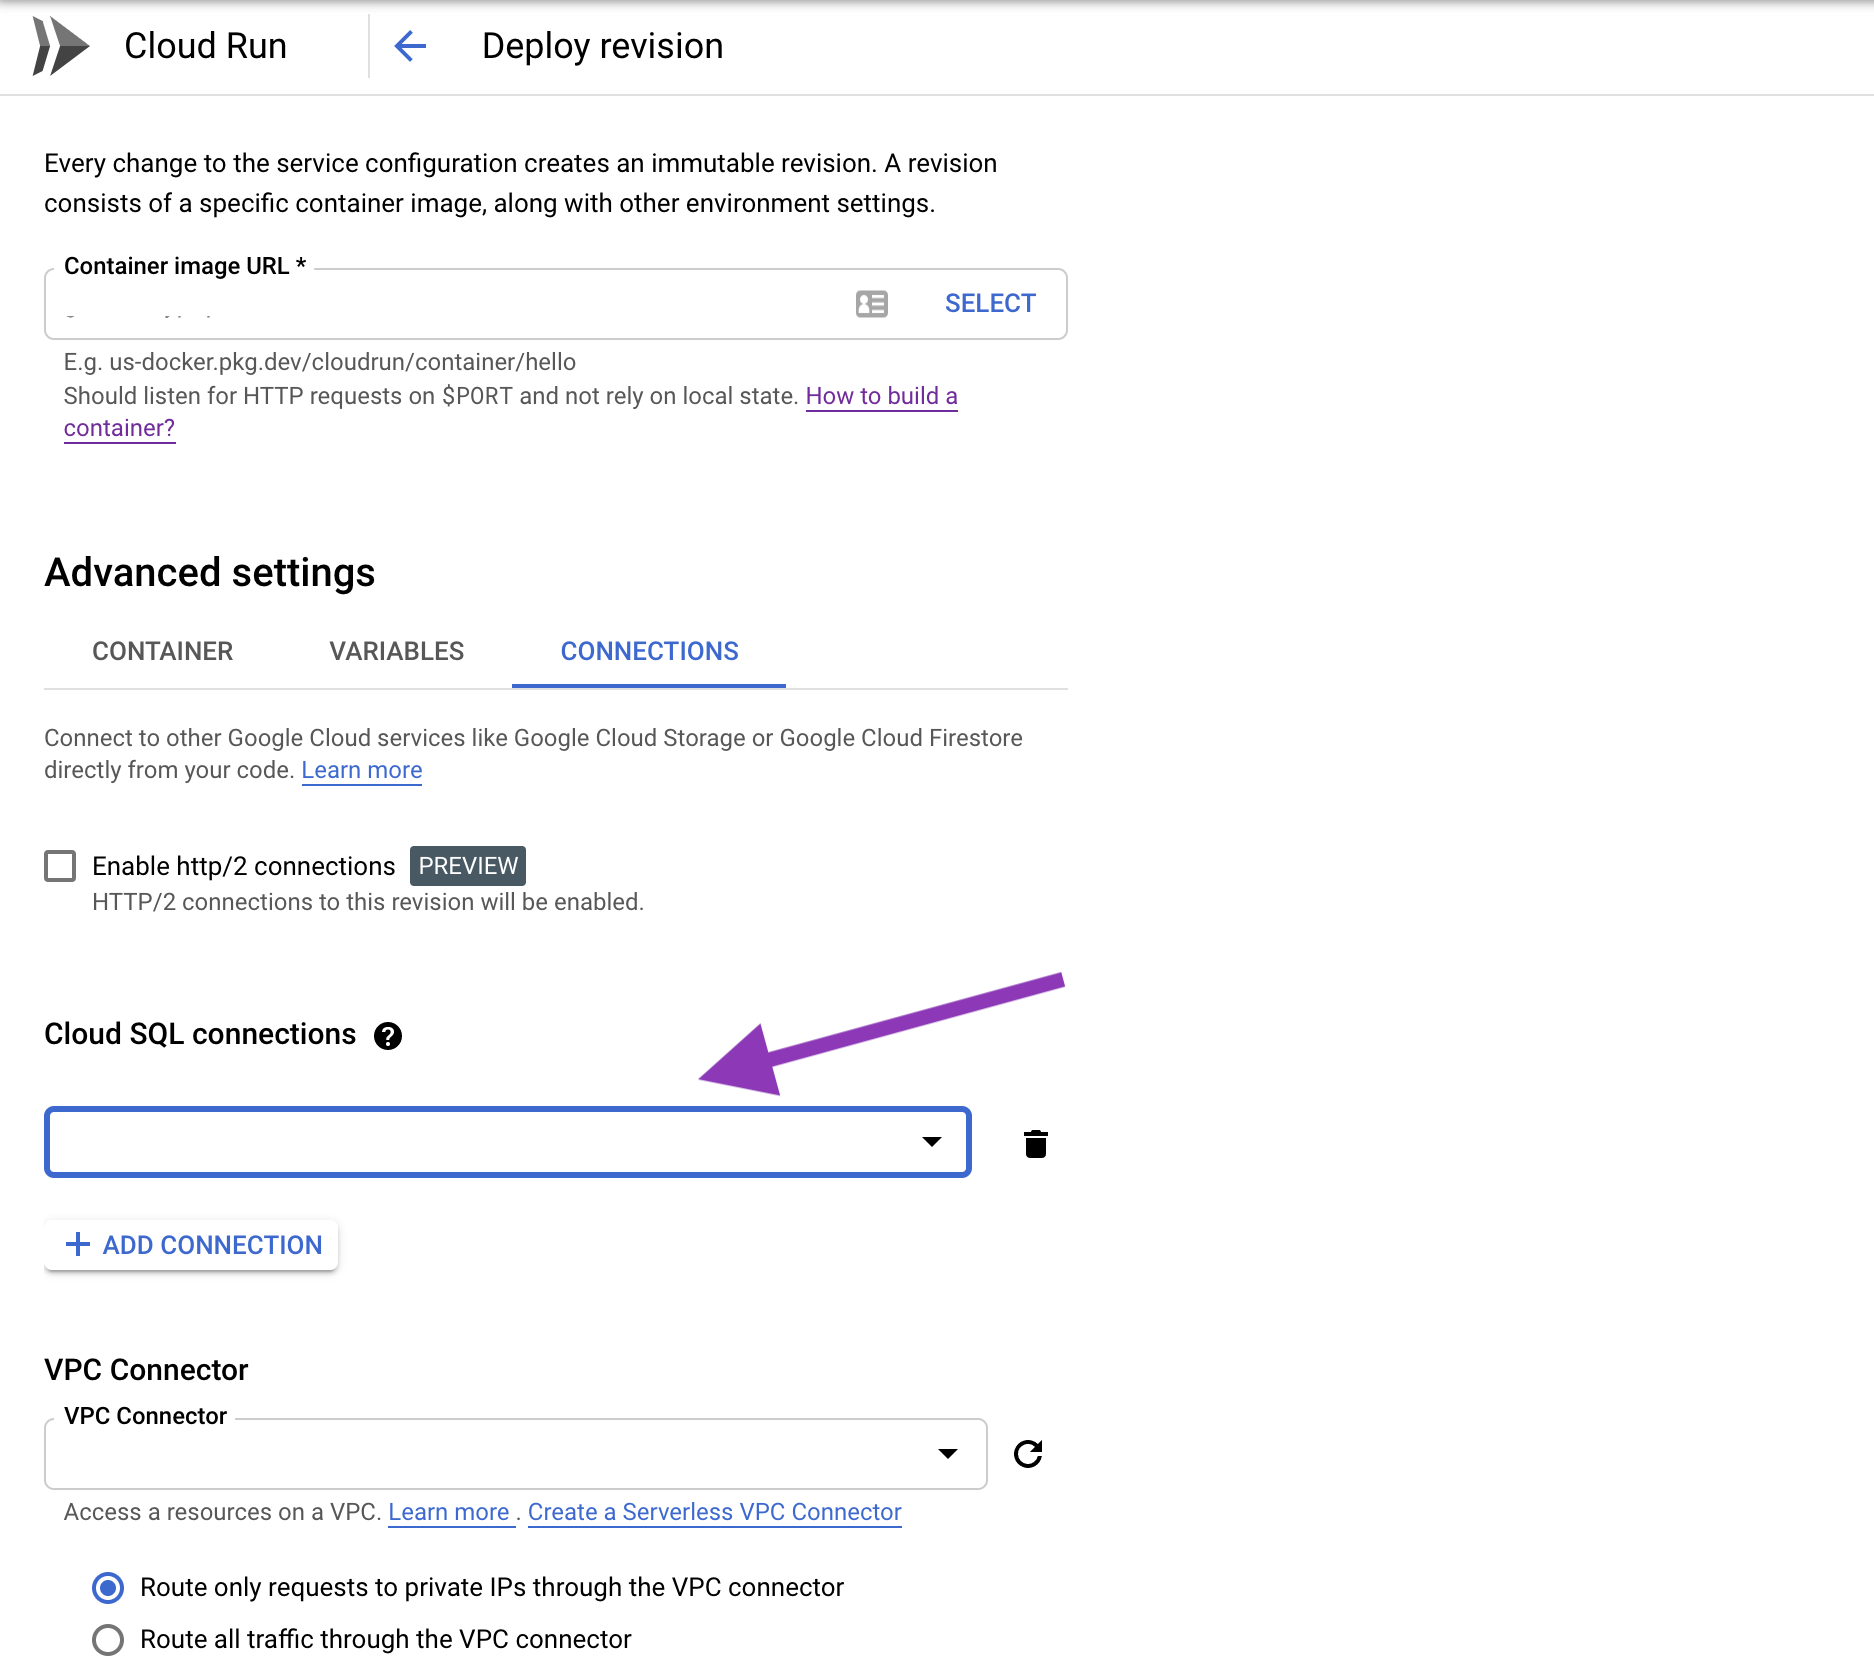
The last step is to link your Cloud Run app to your Cloud SQL instance.
You can add a Cloud SQL connection by editing your Cloud Run app. Click "Edit and Deploy Revision" then select your Cloud SQL instance under the Connections tab.
Alternatively you can use the --add-cloudsql-instances or --set-cloudsql-instances parameters when deploying your app via the gcloud CLI. See the CLI docs.
That'it. You should be all set from a DB point of view.
Memorystore: Redis
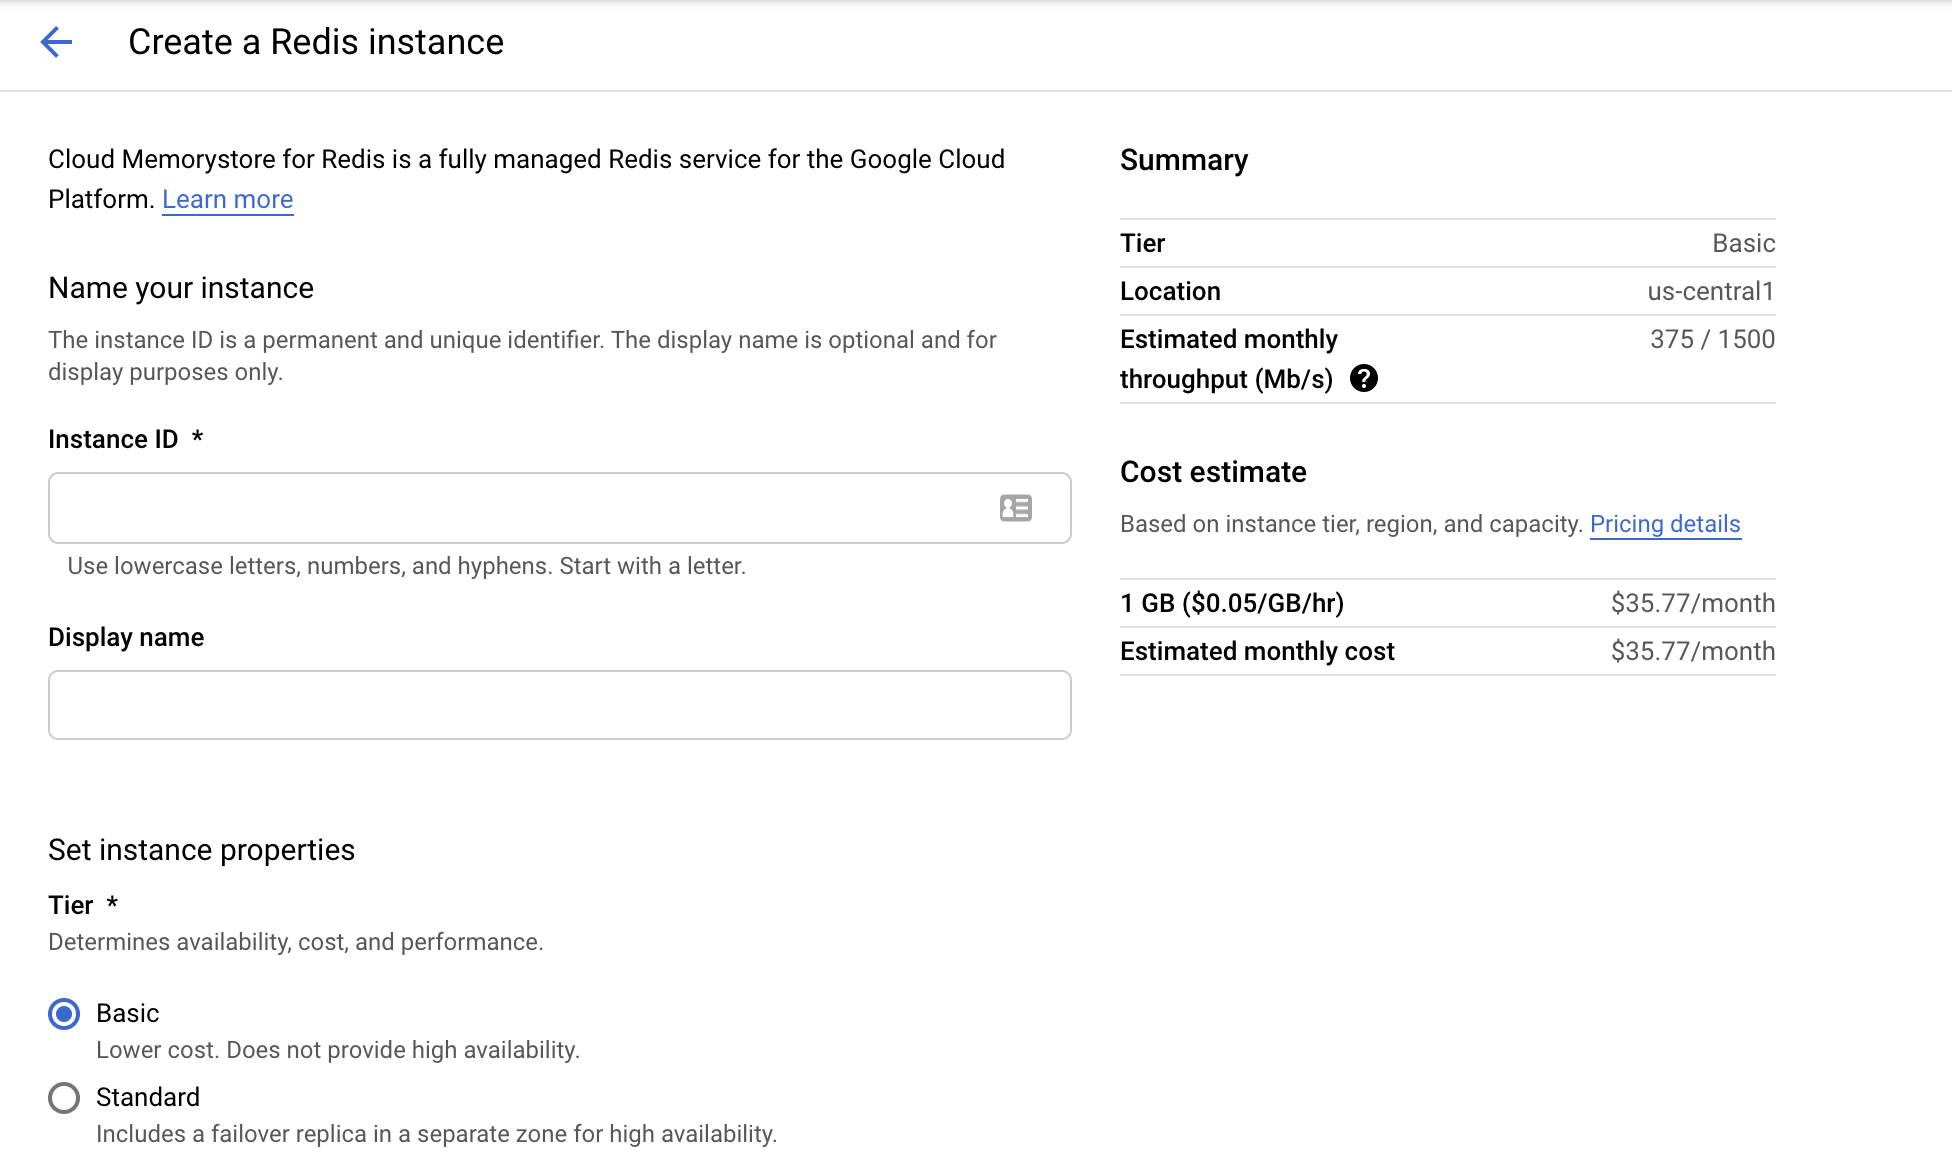
Similar to Cloud SQL, creating a Redis instance is relative easy from the GCP console. Just head to Memorystore then create a new Redis instance.
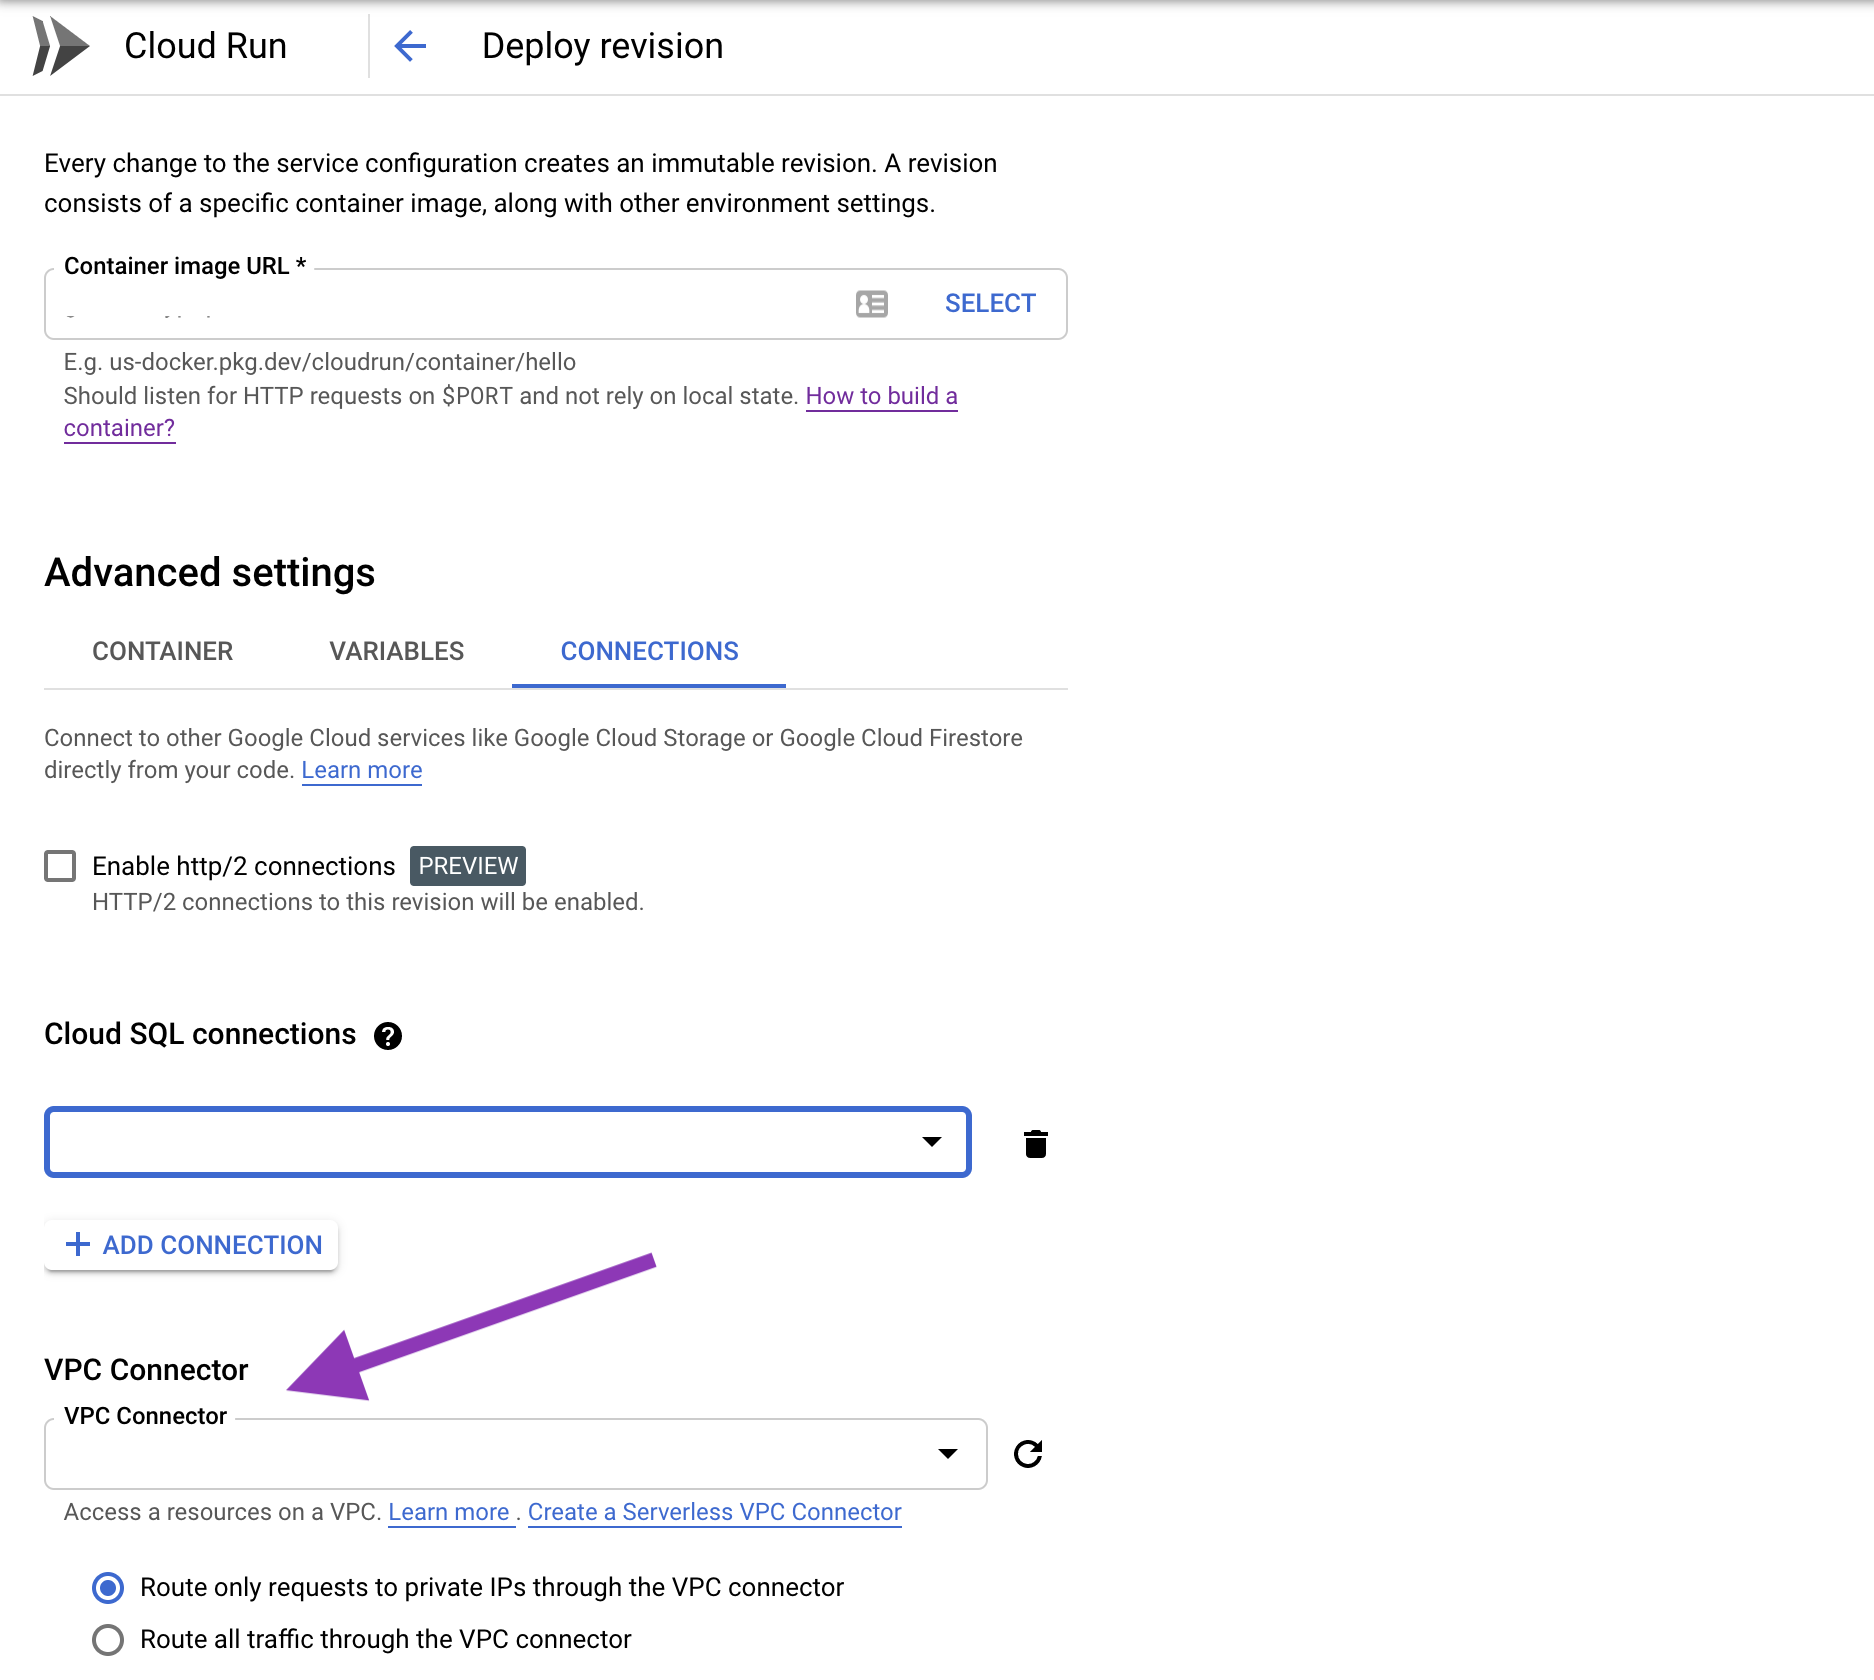
Now we need to configure a VPC connector. A VPC connector is a network bridge allowing your Cloud Run applications to access your GCP private network, where Redis Memorystore instances are located.
Just head to VPC network > Serverless VPC access. Pick a name, select a region, a network (you can usually pick the default network) and an IP range for the connector (the default 10.8.0.0/28 is fine).

Once your connector is ready, head to your Cloud Run application and attach your application to this VPC connector by hitting "Edit and deploy new revision" then linking your app via the Connections tab. This link will ensure your app is plugged to your Redis instance.
Alternatively you can use the --vpc-connector parameter when deploying your app via the gcloud CLI. See the CLI docs.
You can now update your Rails application to point to your Redis instance.
I take this opportunity to warn you that the redis gem is not designed for concurrent access by default. When running in a multi-threaded environment it is recommended to use the redis gem through a a connection pool.
Below is a proper setup for Redis in Rails. You can also read the Rails guide about Redis pooling for more details.
First make sure your Gemfile includes the following:
Create a config file for redis:
Finally, edit your application.rb and specify your cache store:
That's all you need for Redis!
Monitoring: Logging, uptime and tracing
Understanding how your application behaves in production is a must. Think of it as subscribing an insurance for your app.
Don't think you'll do this later, it really isn't complicated - see for yourself in the following sections.
Logging
Sending your Cloud Run logs to GCP Logging is fairly easy.
If using Rails 5+, you can simply set RAILS_LOG_TO_STDOUT=true in your environment variables and logs will start flowing into GCP logging. If you have followed the previous section about Cloud Run deployment then the variable is already set in the Dockerfile we suggested.
If you have modified your production.rb file, just make sure you have the following in your production.rb:
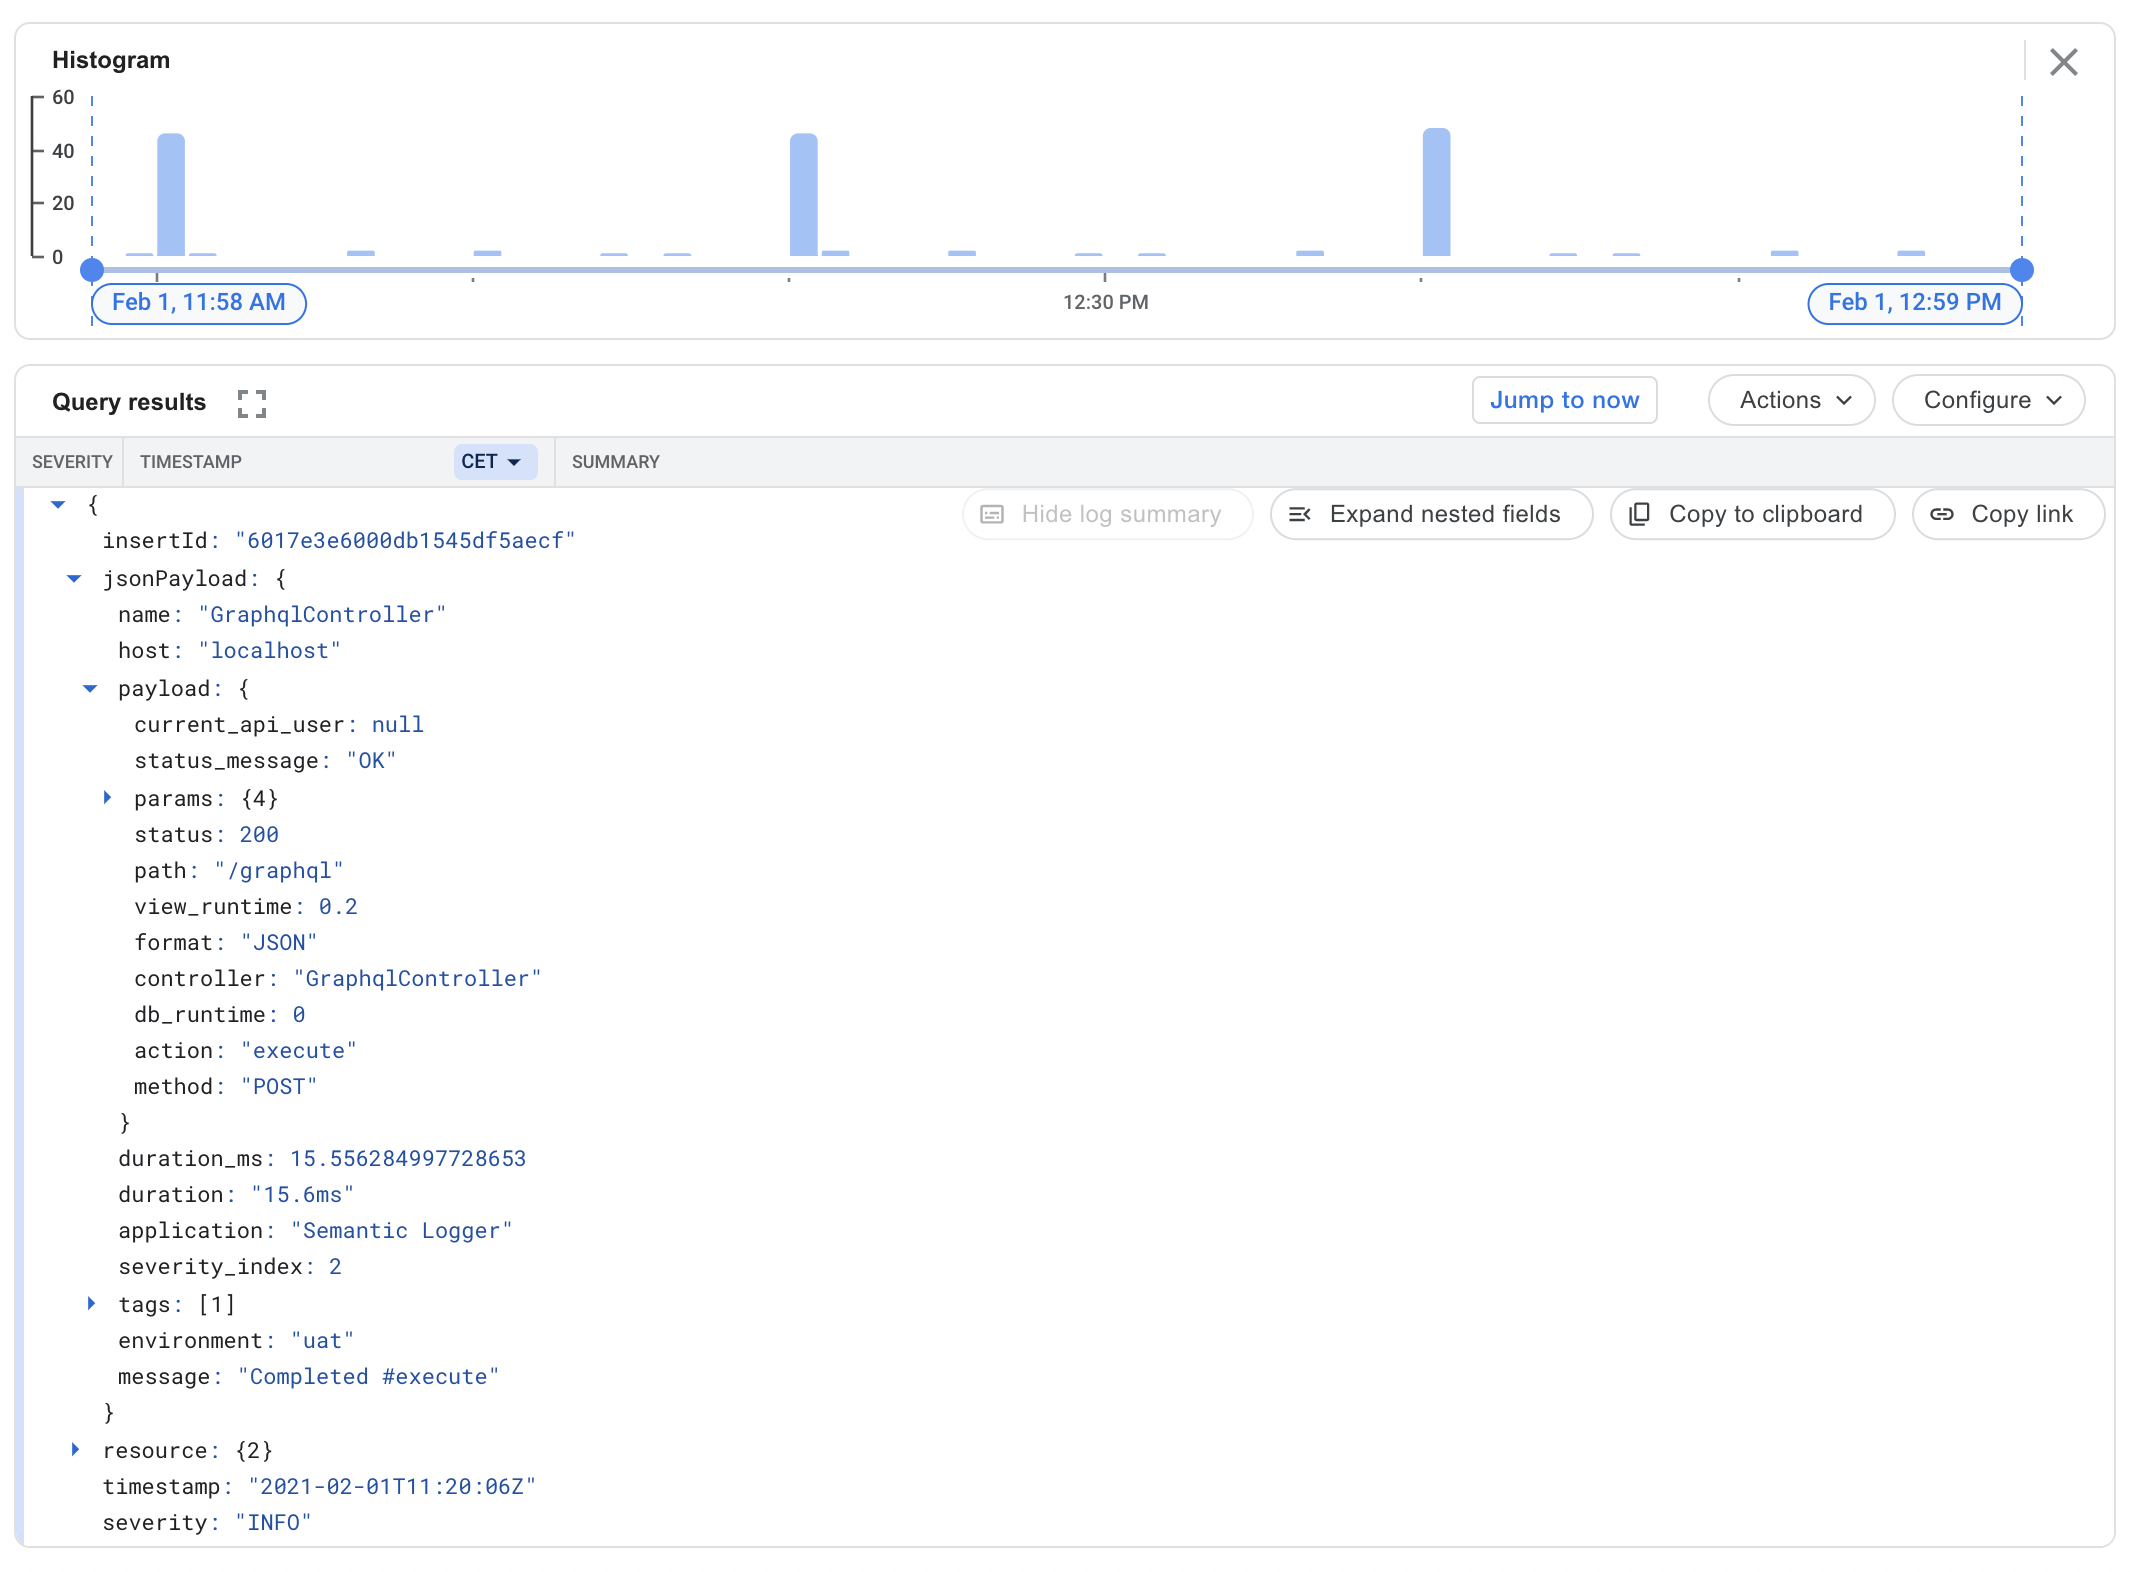
If you want your logging to get fancier, you may try the excellent rails_semantic_logger gem, which will send Rails logs to GCP Logging using structured data instead of plain text.
You can configure Rails Semantic Logger for GCP by putting the following in your production.rb file:
After re-deploying, your logs should become nicely formatted and queryable:
Uptime
It's good practice to check the health of your Rails apps at regular intervals. DB or cache connection failures do happen and you better be on top of these.
For your Rails application, I recommend installing the convenient health_check gem.
The gem provides a lot of prebuilt checks to make your health endpoint(s) actually useful and allows you to define custom checks.
After adding the gem to your Gemfile, you can add the following initializer to have a meaningful health check endpoint:
Once your health check is configured on the Rails side, you can create an uptime check in GCP by going to Monitoring > Uptime checks > Create uptime checks and enter the full URL of your health check endpoint (https://myapp-cloudrundomainid-us.a.run.app/health_check)
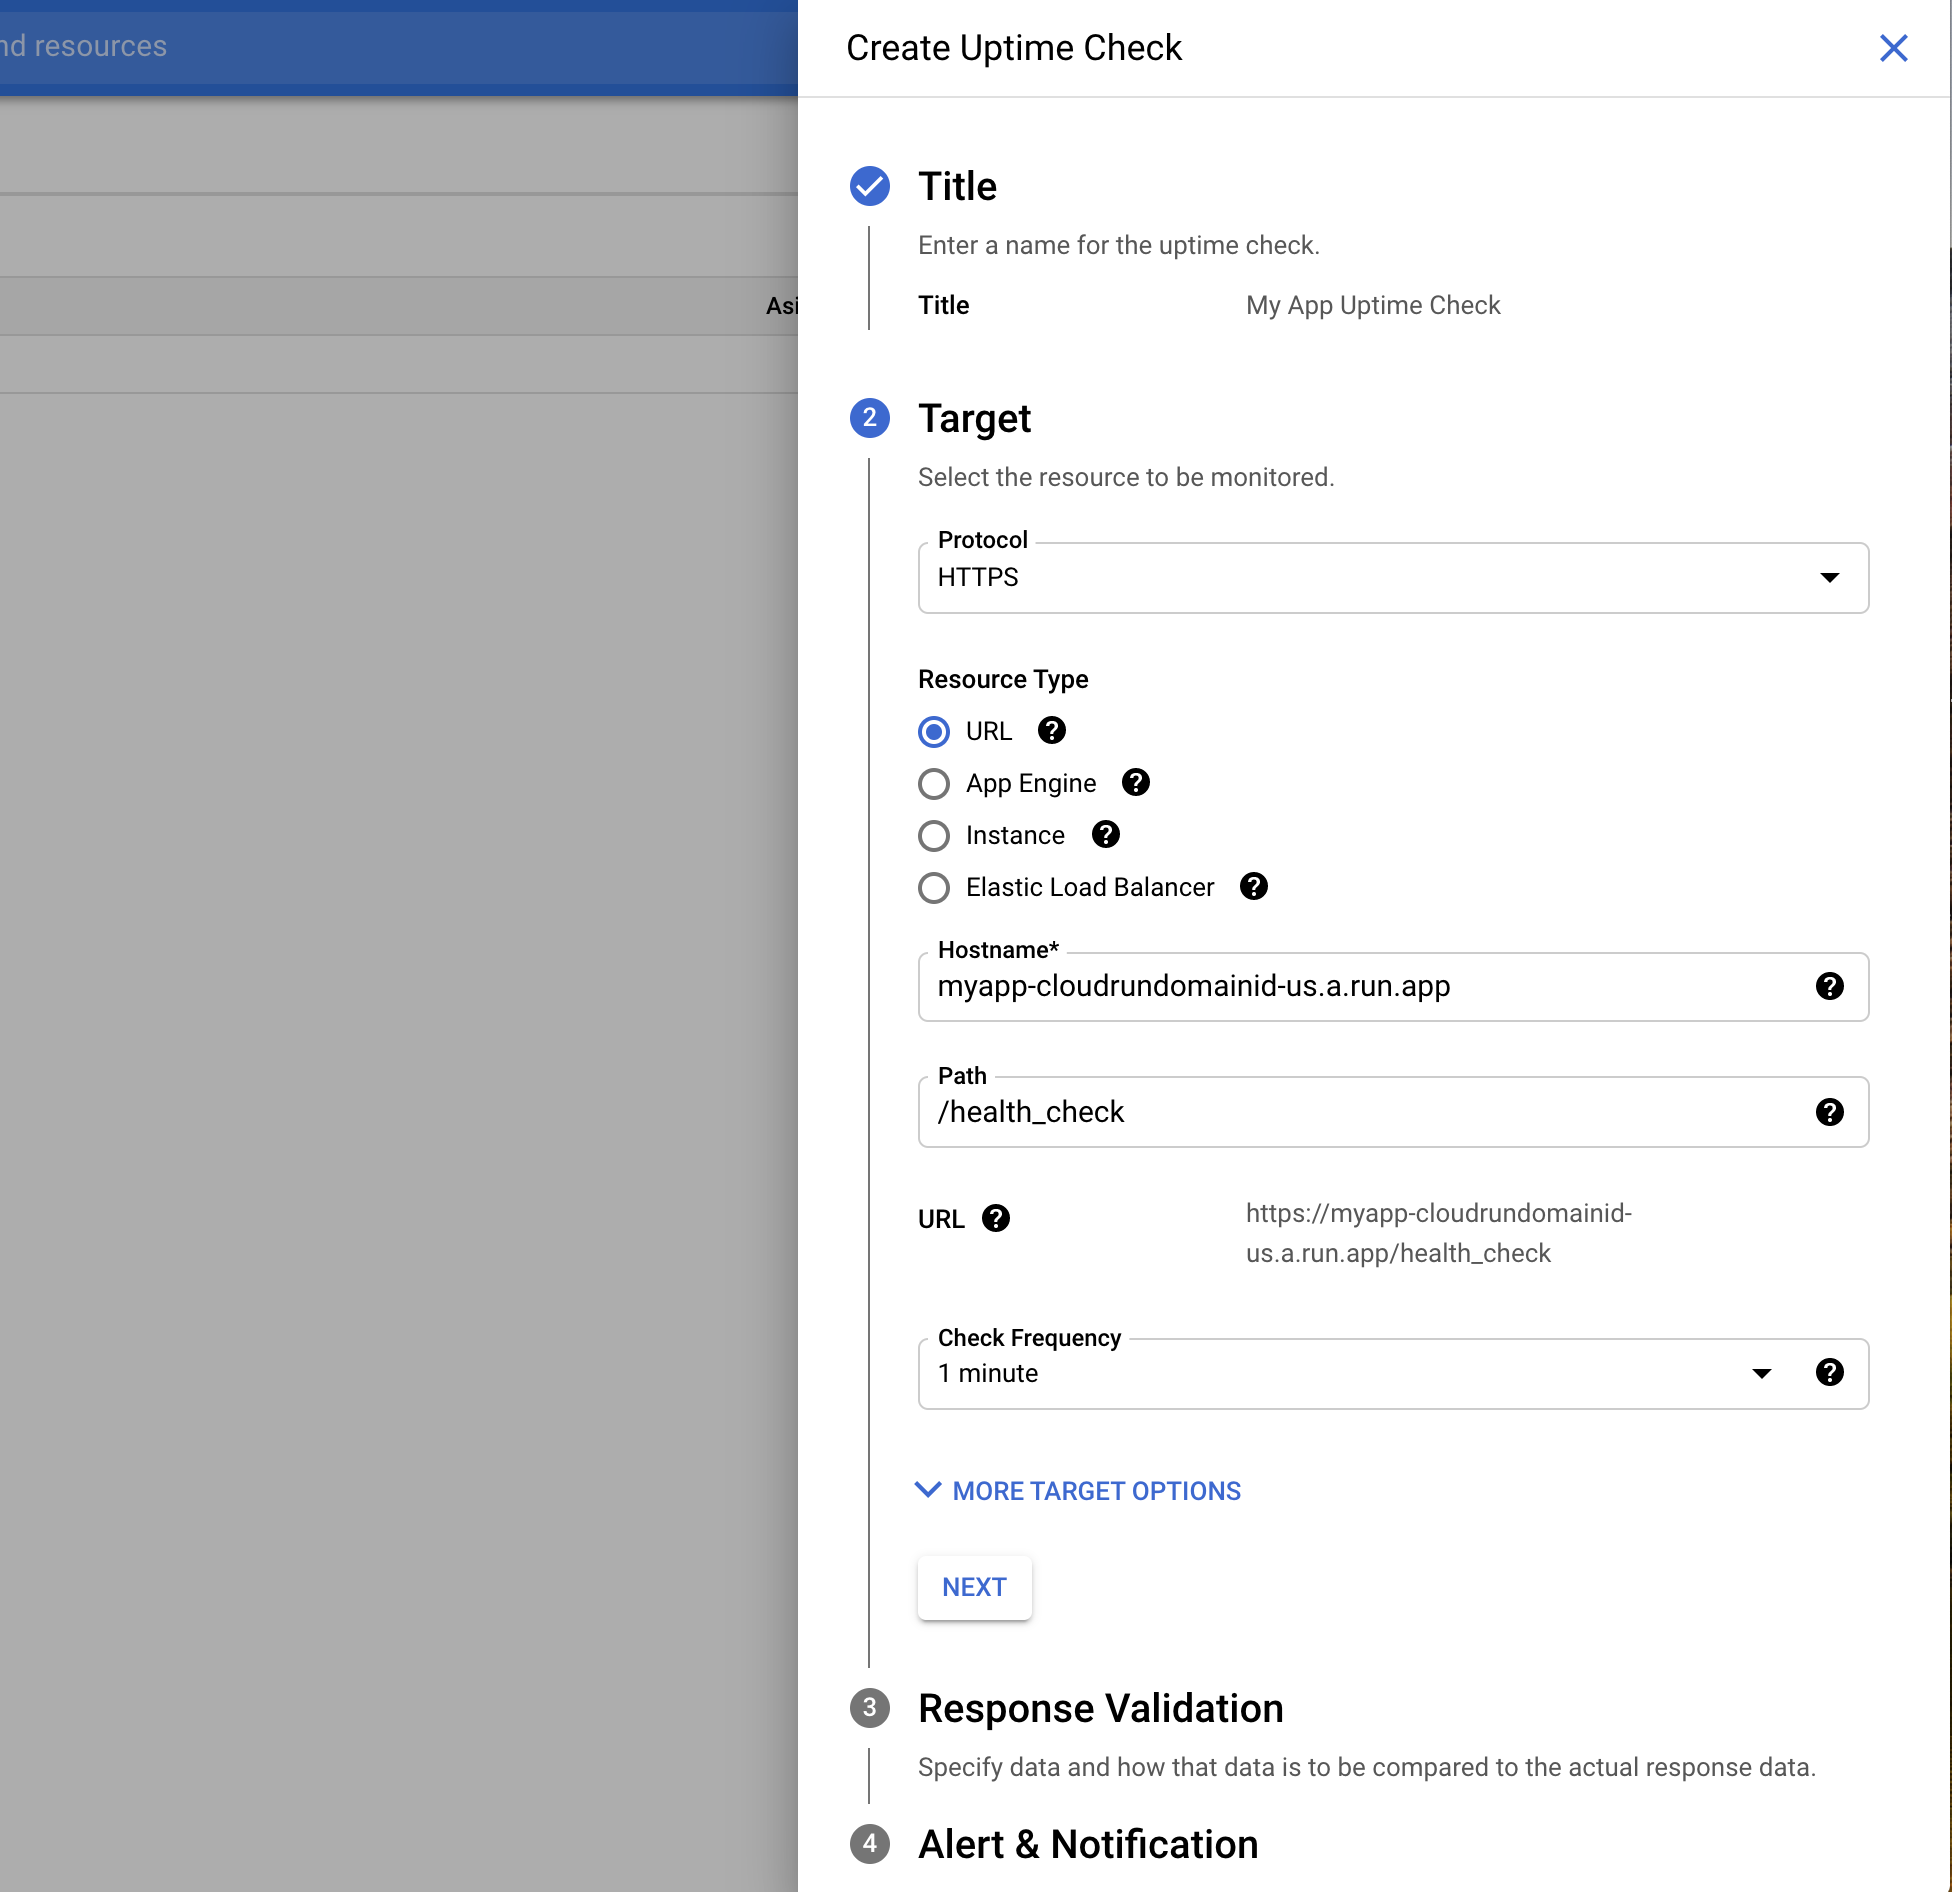
Don't forget to configure a notification channel for alerts. It's pretty easy to connect Slack to GCP Monitoring.
Tracing
GCP Trace is a good way of tracking methods and API calls slowing your application down.
Unfortunately, it's a bit more manual to setup than NewRelic or other application monitoring platforms. Code does not get traced automatically upon adding the gem, we'll have to declare explicitly what we wish to trace.
First let's include the GCP tracing gem in our gemfile:
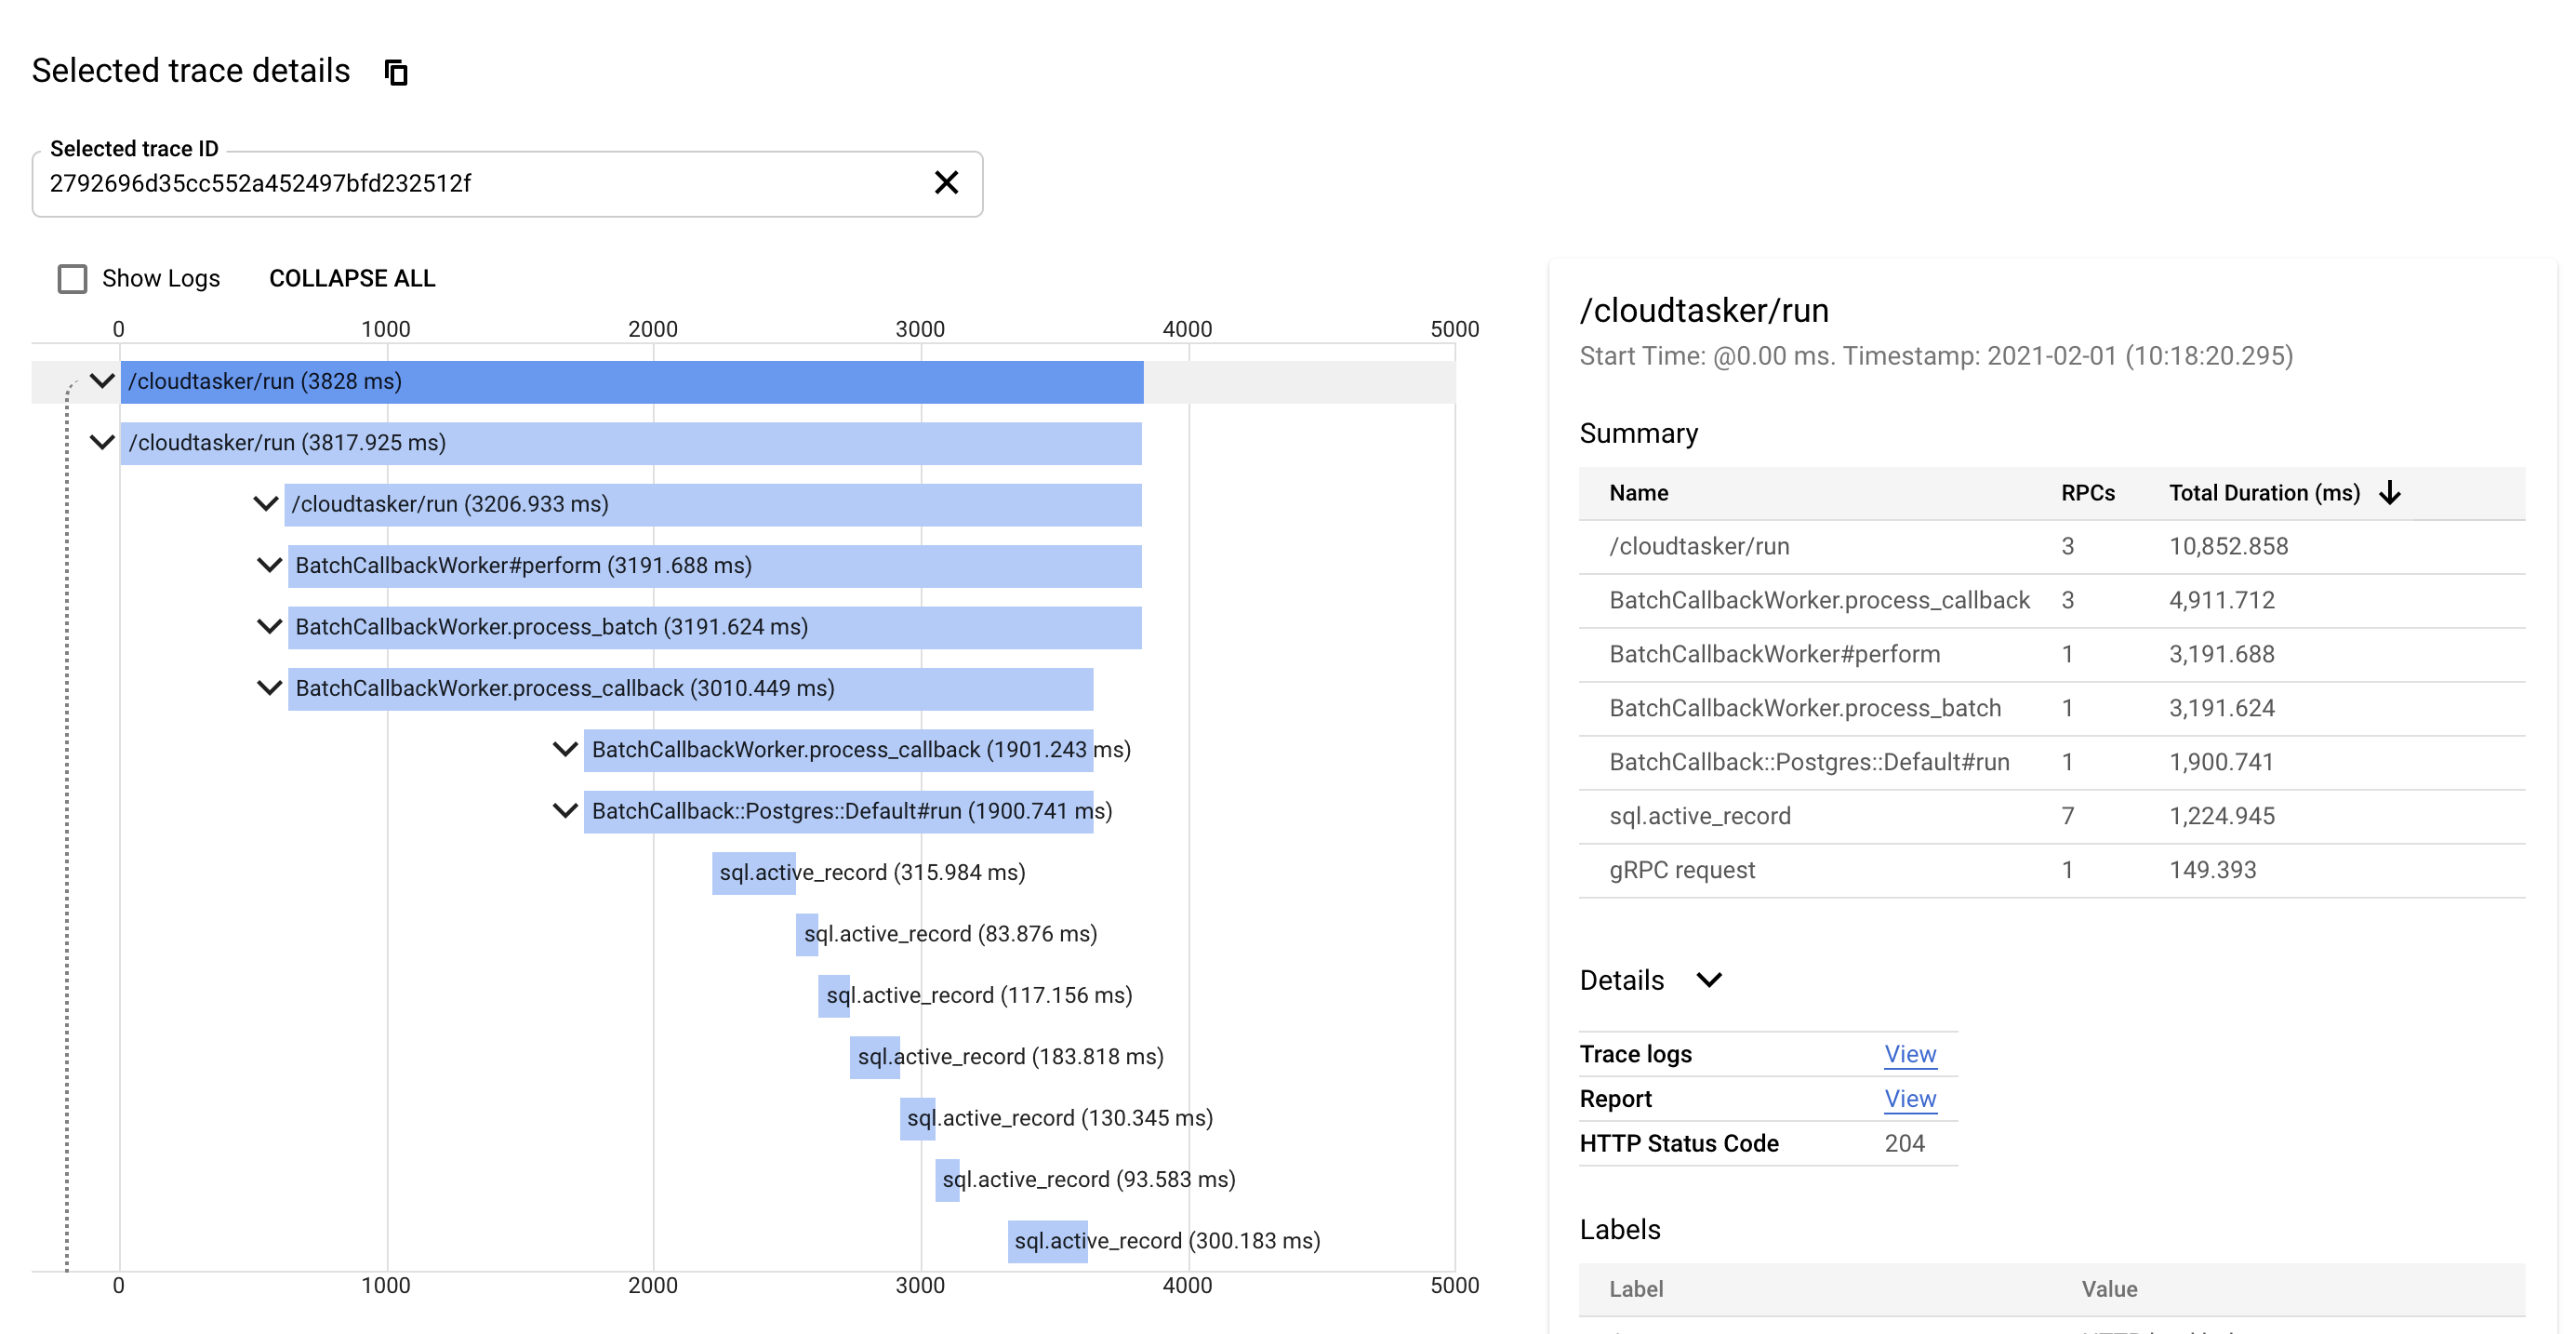
From there you can trace specific calls using trace spans:
This approach works well and allows you to see a proper breakdown of application traces:
Unfortunately it tends to clutter the code a bit, especially when what you want is trace a whole method. At Keypup, we're using the following module to simplify tracing:
This module allows us to declare methods that should be traced, on top of tracing specific portions of the code. As you can see below, it is far less verbose than injecting manual tracing spans inside your methods.
Between CloudRun, Berglas, Postgres, Redis and all the monitoring goodies, you should have a production-friendly app by now. But let's keep pushing to see what more we can achieve!
Background Jobs: Cloud Tasks
A lot of our apps need to perform work in the background. Refreshing data, sending emails, messaging users etc..
When using a serverless runtime like Cloud Run, it's not possible to use traditional background jobs servers such as Sidekiq, Resque or Delayed Job because we do not have running servers. Background jobs must therefore be processed as HTTP requests.
Fortunately, there is a solution: Google Cloud Tasks.
Cloud Tasks is a job scheduler managed by GCP. In essence you enqueue jobs by making an API call with your Job name, arguments, time-to-run and callback URL and Cloud Task will deliver this job to your application when it's due.
Sounds too complex? Well not if you use our Cloudtasker gem. Cloudtasker provides all the logic needed to enqueue and receive/process Cloud Task jobs.
In the end it looks like this:
Cloudtasker supports unique jobs, batch jobs and cron jobs and has a local Cloud Task server for development purpose. The latest release candidate also provides support for ActiveJob.
So if you are on Cloud Run and need background jobs, give Cloudtasker a try!
Cross application messaging: Pub/Sub
The purpose of a microservice architecture is to break down application functionalities in logical components communicating with each other.
The traditional way for cross-component communication is to have APIs on each component that can be invoked by other components to send data or invoke functions.
While APIs are particularly suited for function invocations, they're actually not ideal for sharing events.
Let's say all your components need to be aware of new users. Are you going to ask your main component to make an API calls to each microservice component? That's a waste of time and energy. Let's look at Pub/Sub instead.
Pub/Sub is designed to manage event queues and subscriptions. Some of your components publish events to topics and some other subscribe to these topics. In the middle there is GCP Pub/Sub handling the hard work of delivering events via webhooks to the subscribing components.
So wait, you mean I've got to integrate to Pub/Sub to be fancy enough now? You don't, we've got you covered. Our Cloudenvoy gem is Rails-ready and will handle all the low level aspects.
In the end all you need to do is write publishers and subscribers. Cloudenvoy will do the rest.
With Cloudenvoy, cross-messaging becomes dead-easy. Why not use it and make your microservice architecture even more scalable? :)
Wrapping up
This guide is only designed to give you a good head start when deploying backend Rails applications on GCP.
From there feel free to modify the build steps we've provided and explore the other services available based on your needs: Storage Bucket for assets, BigQuery for managing large datasets, Dialogflow for chatbots etc..
There is a lot you can do from there :)
About us
Keypup's SaaS solution allows engineering teams and all software development stakeholders to gain a better understanding of their engineering efforts by combining real-time insights from their development and project management platforms. The solution integrates multiple data sources into a unified database along with a user-friendly dashboard and insights builder interface. Keypup users can customize tried-and-true templates or create their own reports, insights and dashboards to get a full picture of their development operations at a glance, tailored to their specific needs.
Code snippets hosted with ❤ by GitHub